Ultimate 3D Model Viewer Plugin
Table of contents
Installation and operating instructions - CMS WordPress
Ultimate 3D Model Viewer is a plugin written by us and is used within the WordPress content management system to display individual, configurable 3D models in various areas of your website. The plugin is available both as a free entry-level version as well as a powerful premium version with extended functions. Below is a direct comparison of the functional scope of both versions:
FREE
- Embed 3D Models: Place your 3D models anywhere on your website
- Supported 3D formats: Upload your 3D model as .GLB, .GLTF or .USDZ
- Customizable skybox: Select custom skybox backgrounds for your 3D models
- Show real life dimensions: Display exact product sizes on your 3D models for better customer clarity
- WooCommerce Integration: Display your WooCommerce products as 3D models on your product pages
- Elementor support: Bring your 3D models to life effortlessly using Elementors UI
- Gutenberg support: You prefer using the classic block editor? Seamlessly add 3D models with full Gutenberg block support
- Fully responsive: Adapt your 3D models seamlessly to all screen sizes
- Multilingual Support: Fully integrated English and German interface, content, and documentation
PREMIUM
- Embed 3D Models: Place your 3D models anywhere on your website
- Supported 3D formats: Upload your 3D model as .GLB, .GLTF or .USDZ
- Customizable skybox: Select custom skybox backgrounds for your 3D models
- Show real life dimensions: Display exact product sizes on your 3D models for better customer clarity
- WooCommerce Integration: Display your WooCommerce products as 3D models on your product pages
- Elementor support: Bring your 3D models to life effortlessly using Elementors UI
- Gutenberg support: You prefer using the classic block editor? Seamlessly add 3D models with full Gutenberg block support
- Fully responsive: Adapt your 3D models seamlessly to all screen sizes
- Multilingual Support: Fully integrated English and German interface, content, and documentation
- Customizable loading screen: Set up a loading screen that attracts the attention of your customers
- Environment support: Ignite realism with stunning reflections using full HD radiance lighting
- Advanced tone mapping support for vibrant visuals: Unleash stunning visuals with powerful tone mapping that brings your models to life
- Exposure Control: Exposure Adjustment for Stunning Visual Impact
- Shadow adjustments: Add realistic depth to and dimension to your models with customizable shadows
- Precise Camera Controls: Fine-tune a bunch of camera objects like a custom camera angle and more for perfect presentation
- Smart Loading Strategy: Optimize load times with adaptive and efficient 3D model loading
- Dynamic Auto-Rotation: Enable and disable 360-degree auto rotation
- AR Viewer Compatibility: Seamless mobile AR with custom USDZ models for immersive experiences.
I. Installation
There are three different options available for installing the plugin. Select the appropriate method according to your requirements and the plugin version used - Free or Premium.
I.I Installation via Upload
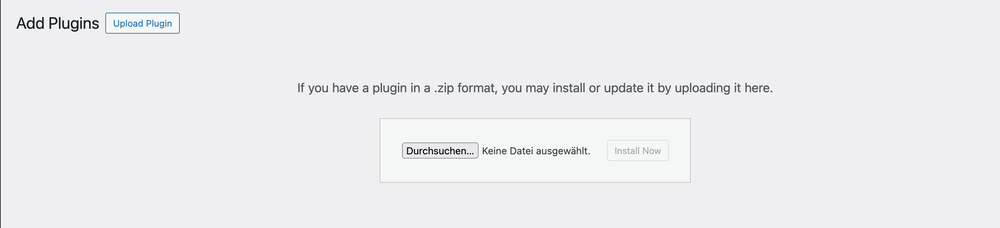
To install via upload, you first need a corresponding ZIP file, which you will receive after contacting us. Then navigate to the backend area of your WordPress site on which the plugin is to be installed. Open the Plugins panel there and then confirm the Add plugin button, which is located in the upper area. The WordPress plugin directory should then be displayed. There you will also find the Upload plugin option at the top, which you can confirm by clicking on it again. You can then upload the supplied ZIP file via the panel that then opens. Finally, confirm the installation by clicking on the Install now button after uploading the file.

I.II Installation via WordPress plugin directory
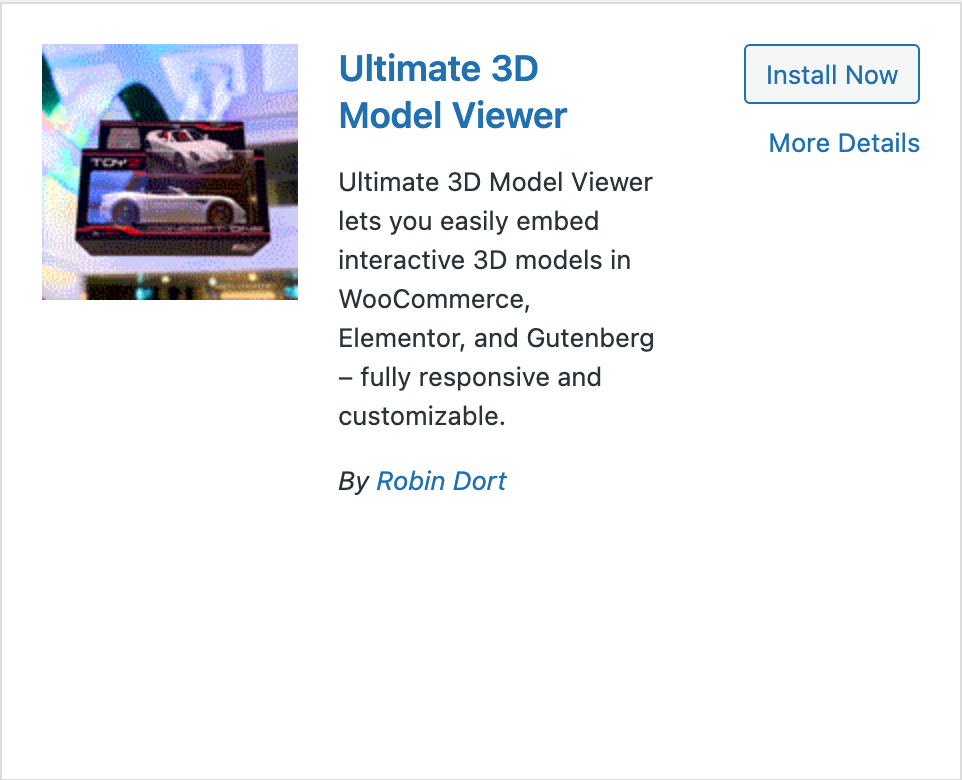
The installation via the WordPress plugin directory is carried out in the usual way, as you know it from the installation of your other plugins. To do this, navigate to the Plugins section in your WordPress backend again and click on the Add plugin option. The Wordpress plugin directory should be displayed again. Please search for the name of our Ultimate 3D Model Viewer plugin in the Search plugins button provided. There is also the option to search for terms that describe the functionality of the plugin, such as 3D or Model Viewer. In this use case, you will be shown several plugins that offer similar functions to your search term. Please search the list again for the name of our Ultimate 3D Model Viewer plugin. Finally, confirm the installation with the Install now button, which you will find to the right of the tab provided.

You can also use the button below, which will take you directly to the corresponding WordPress plugin page.
I.III Installation via FTP-Upload
For installation via FTP, you will also first need the ZIP file provided by us. Then open the FTP program you trust and connect to the server on which your website is located. Then navigate to the /wp-content/plugins directory in the menu. Please upload the supplied ZIP file there and unzip it after successful upload. Next, open the backend area of your WordPress site and navigate to Plugins. Activate the now listed Ultimate 3D Model Viewer plugin by clicking on the Activate button.
II. Usage
Once the installation is complete, you now have the option of presenting your 3D models on your website. Depending on the website builder you have chosen, you have various options for implementing this, which are explained below.
II.I Integration via Elementor
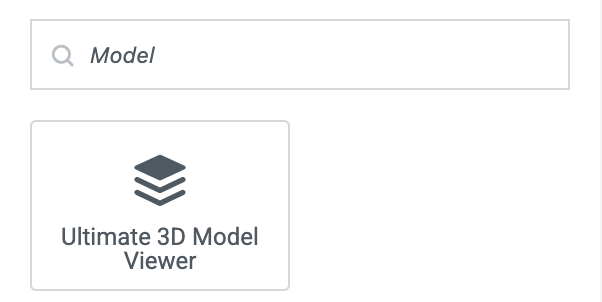
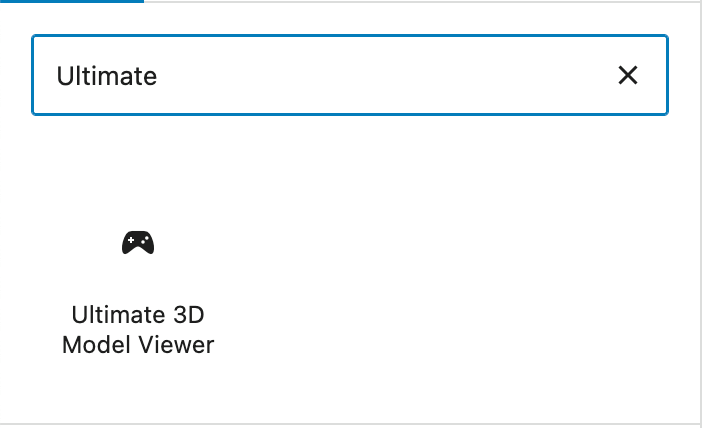
The integration via Elementor is, as usual, also done by using a provided widget. First navigate to the desired page on which you would like to integrate the 3D model and open the website builder there by clicking on the Edit with Elementor option. A panel should then open on the left-hand side of your screen, allowing you to integrate new widgets. If this is not the case, please first click on the plus sign at the top left of the navigation bar. Now search for one of the following terms in the Search widget field provided:
- 3D
- Model Viewer
- Ultimate 3D Model Viewer
- Ultimate
- Model
Each of these selected terms limits the widgets displayed to those of our plugin. Now drag & drop the widget to the desired position where you want to place the 3D model.
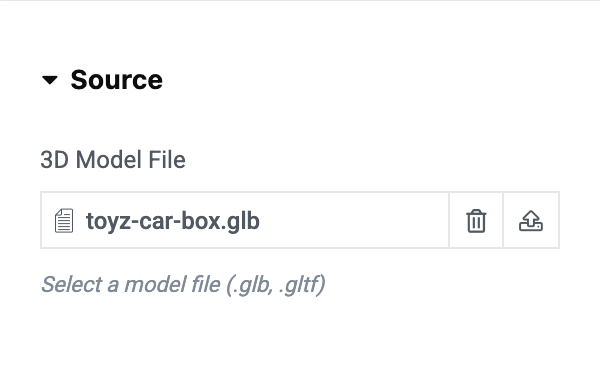
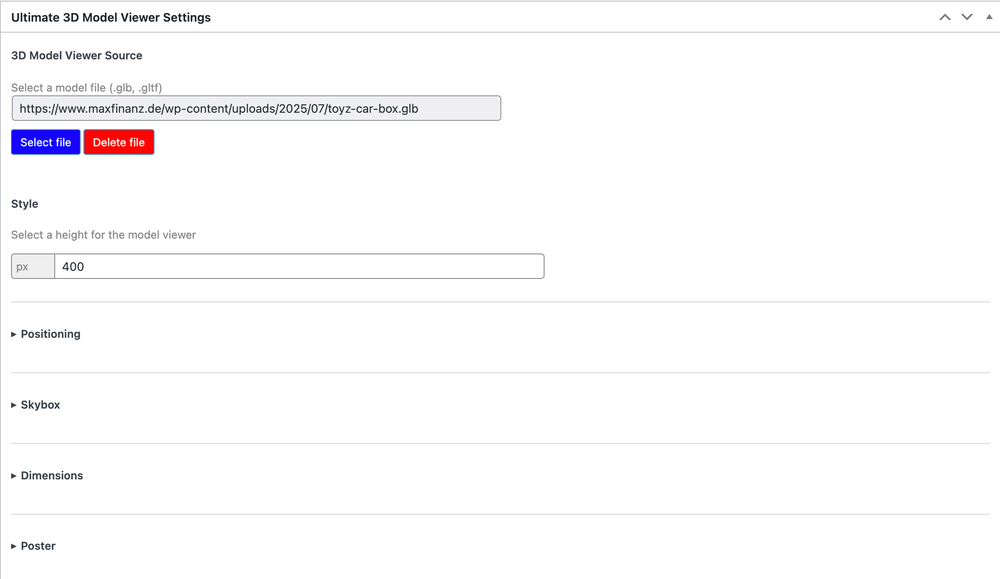
You now have the option of customizing the viewer using various configuration parameters. However, only the Source area is decisive for displaying the model. To upload your file, click on the upload button in the 3D model file area and then select your desired 3D model. The following file types can be used as valid files:
- .glb
- .gltf
- .usdz
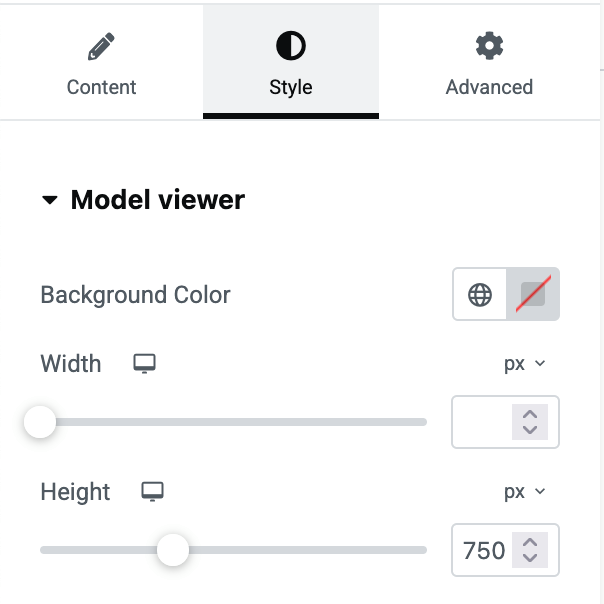
The latter is only used as a configuration parameter for IOS augmented reality devices and is used in a later configuration section. Please note that, depending on the size of your file, you may first need to increase the available upload size of your WordPress site, as this is initially limited by default. After selecting your file, you should already receive a first preview of the model from Elementor. You also have the option of adjusting the height of the viewer. To do this, navigate to the style tab, which is located in the second position of the widget. Change the value in the Height input field. If you do not make any changes to the height of the viewer, it has a default value of 750px. You do not need to change the width of the viewer, as it always takes up 100% of the width of the surrounding container. If you still want to limit the width of the viewer, please use one of the container widgets provided by Elementor. If you keep the full width, the height of the viewer adjusts automatically when the screen is reduced in size. The viewer is therefore already fully responsive. To finally publish the model, click on the Publish button to view it on the official site.
The other configuration parameters and how they are used in relation to the Model Viewer are explained below. The parameters always work the same regardless of the selected website builder and can therefore be used in the same way if the viewer is used in one of the other available areas such as WooCommerce or Gutenberg.
II.I.I Skybox
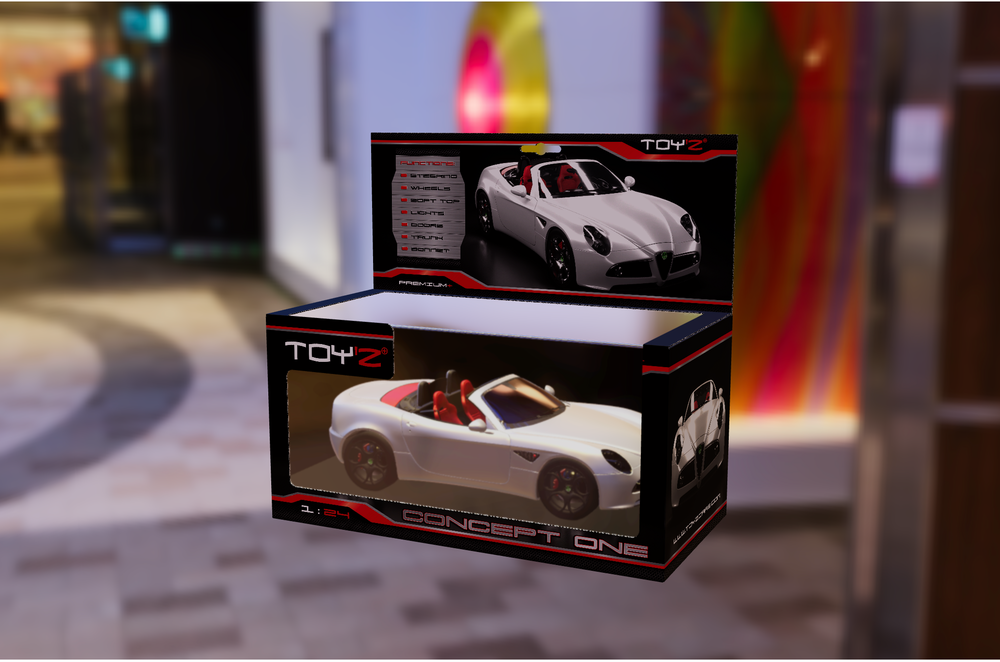
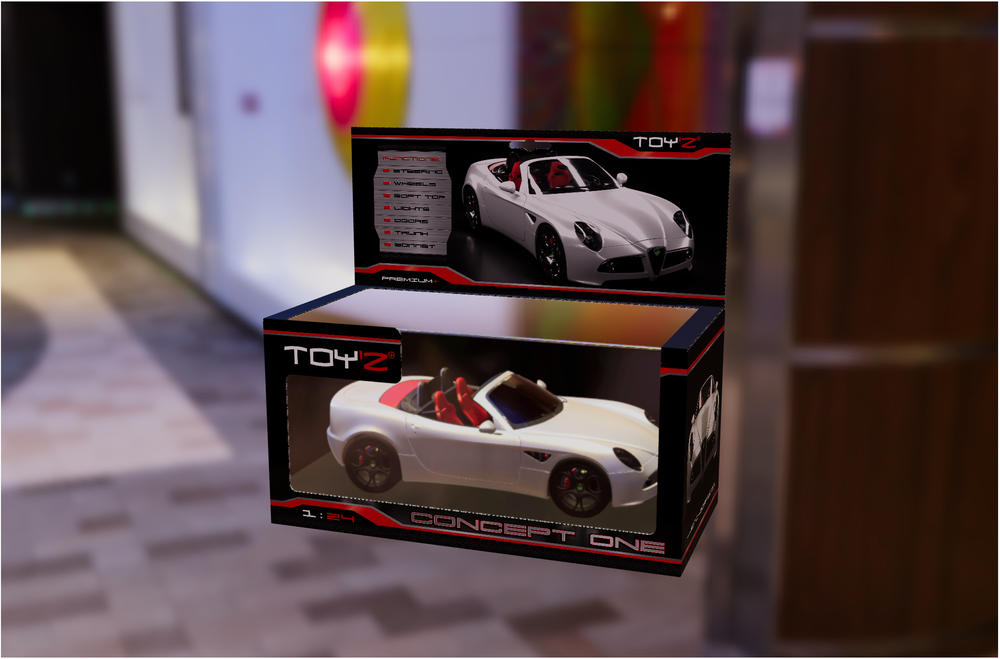
The skybox can be used to add a background image to your model. To select, click in the Skybox area and then press the plus button in the field provided. The following files are accepted as valid:
- .jpg
- .jpeg
- .png
II.I.II Dimensions
The viewer offers you the option of displaying the real dimensions of your model. This is particularly useful if you want to use the viewer in combination with WooCommerce. In this way, you can already bring out different dimensions in the 3D presentation of your product. All you have to do is click on the Show dimensions of the 3D product button in the Dimensions area. The dimensions are then automatically calculated based on your model and displayed on the published page.
You also have the option of using an additional scaling factor. This is optional and only useful if your model is too large or too small. Depending on the factor entered, for example 10 or 0.1, the calculated dimensions are then enlarged or reduced accordingly.
If you do not want to use the real measurements of your model for various reasons, you can also replace them with your own measurements. To do this, confirm the Use custom dimensions option. You can then enter the width, height and depth of your product in the fields provided. Once the page has been published, the entered values are then used instead of the real dimensions.

II.I.III Poster
Using the poster option, you can add an image to the viewer while it is loading.
To do this, simply upload your desired image using the WordPress media uploader and confirm this. The image can then be viewed in the preview during the loading process.
II.I.IV Environment
The environment area gives you the option of adding an environment image to the 3D scene. This environment influences light reflections and materials in the scene and creates impressively realistic surfaces. With the right environment image, you can create photorealistic scenes with an astonishing level of detail. The following files can be used as a valid environment:
- .hdr
- .jpg
- .jpeg
Originally, only HDR (High Dynamic Range) files were used as the environment, as these have the ability to display a greater range of color and contrast levels, which brings out the details in darker and brighter areas of the image. Thanks to new algorithms, however, it is now also possible to use JPG files instead of the original HDR files. This has the advantage that they do not require quite as much memory and therefore reduce the load on your website.

II.I.V Tone Mapping
Tone mapping is a process used in computer graphics and photography to adjust high dynamic range (HDR) images so that they can be displayed realistically on normal dynamic range (SDR) screens. This is important so that modern 3D renderings and photos can contain extremely bright and dark areas at the same time - more than a normal screen can display. Without tone mapping, these areas would otherwise appear burnt out (white) or completely black. The Model Viewer already provides you with several predefined methods to choose from, which you can freely select depending on the application. Each of these modes modifies the contrast and lighting conditions of your scene. The following modes are available:
- neutral
- aces
- agx
- reinhard
- cineon
- linear
- none
II.I.VI Exposure
Exposure ensures a brighter or darker brightness of the model in your scene. A value of 1 to 10 is available, which you can adjust individually as required.
II.I.VII Shadows
To further develop your scene, the viewer offers various configuration parameters for editing individual shadow settings. A distinction is made between shadow intensity and shadow softness. The shadow intensity can assume values between 0 and 1. A higher value results in darker shadow areas, while a lower value lightens them. Shadow softness determines the degree of sharpness or blurriness of the model's shadows. This can also assume a value range between 0 and 1. Higher values result in the shadows appearing softer and blurrier, while lower values result in greater sharpness.
II.I.VIII Camera options
The camera options are crucial for the effective presentation of your scene. By skillfully adjusting these elements, you can offer the user a unique experience. The following parameters are available:
- Camera orbit: The initial angle and the position of the scene camera are determined according to the values specified there. Three individual values are required to specify these: Theta (horizontal rotation), Phi (vertical rotation), and Radius (distance to the model). A valid specification of the camera orbit would therefore be 0deg 75deg 2m, for example. It is also possible to set the camera trajectory based on the user's scroll position. For this special case, however, the use of CSS (Cascading Style Sheets) is required. The special calc() function is used for this purpose. Instead of fixed values for theta, phi and radius, these can now be calculated using certain page parameters. A possible example could look like this: calc(-1.5rad + env(window-scroll-y) * 4rad) calc(0deg + env(window-scroll-y) * 180deg) calc(5m - env(window-scroll-y) * 10m). After successful specification, the camera position then changes depending on whether the user scrolls down or up on the page.
- Maximum camera orbit: Here again, the three values for theta, phi and radius are required. The specification of these three values determines how far the user can rotate or zoom the camera. A valid value would be, for example: Infinity 180deg auto.
- Minimum camera orbit: Follows the same principle as the maximum camera orbit. This determines how close the user can rotate or zoom the camera. A valid example specification: -Infinity 0deg auto.
- Camera target: The camera target determines the set focus of the scene camera. Theta, Phi and Radius are also required here. After specifying the values, the camera focuses on a specific point within your 3D scene.
- Field of view: The field of view determines the configuration of the camera's vertical field of view. In this case, a value between 0 and 180 degrees is accepted. A lower value results in a smaller field of view, a higher value results in a wider field of view.
- Maximum field of view: Here you can enter a degree beyond which the field of view may not go.
- Minimum field of view: Enter the value below which the field of view must not be reduced.
II.I.IX Loading options
The associated loading strategy defines the time at which the Model Viewer presents the 3D model. The following strategies are available for selection:
- lazy: Loads the model when it is near the user's active viewport. This is a good way to further reduce the initial load of your website, as the model viewer only comes into action when the user has it in their field of vision. This avoids unnecessary preload times.
- eager: If you require an immediate display of your model, select the eager setting. If this is set, all viewers with this setting will be loaded the first time your page is called up.
- auto: This is the default setting of the viewer. If set, it assumes the same behavior as lazy.
II.I.X Rotation
With the automatic rotation setting, the model can be permanently rotated 360 degrees at a preset speed.
II.I.XI Augmented Reality
It is also possible to use the viewer on a mobile device. In this case, it is possible to provide an augmented reality environment specially designed for 3D models. This function allows the user to place and view the model with their camera in their own environment. As previously mentioned, the iOS environment provides a special USDZ file format. The appropriate model can be selected for these devices within the iOS model option by selecting the corresponding file.
II.II Integration via Gutenberg
The integration via Gutenberg differs slightly from working via Elementor. This is because Gutenberg uses a specific block editor instead of drag & drop widgets. To use Gutenberg, first navigate back to the page on which you want to use the Model Viewer. Then select the Edit page option in the top navigation bar. The Gutenberg editing editor should now open. There are now two options for inserting the Model Viewer at the desired location.
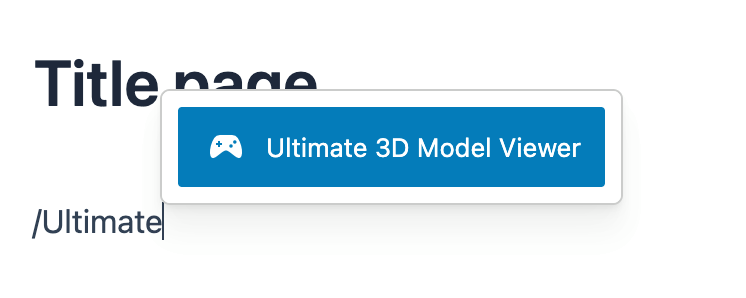
Option 1: Integration via Block-Slug.
This is done by searching for the block at the desired position on the page using special text input. To do this, first enter the “/” character and then your desired search term. You can use any of the search terms mentioned in section II.I Integration via Elementor. For a complete overview, all terms that lead to the desired Ultimate 3D Model Viewer block in Gutenberg are listed again below.
- 3D
- Model Viewer
- Ultimate 3D Model Viewer
- Ultimate
- Model
After entering the slug /Ultimate 3D Model Viewer, the assigned block should be displayed. Finally, confirm the entry with the Enter key.
Option 2: Integration via Block-Suche
If you do not want to use the slug variant and prefer to integrate your elements in the usual way, you can also do this using the block search provided. To do this, first open Gutenberg's block inserter menu by clicking on the plus sign in the top left-hand navigation bar. A full list of all available Gutenberg blocks should then be displayed. Now search for one of the previously mentioned search terms. After entering it, the available blocks should be reduced to that of the viewer. Confirm the selection by clicking on the Ultimate 3D Model Viewer icon.
To edit the configuration settings of the viewer, please first open the document overview of your current page, characterized by three horizontal lines, which are slightly shifted below each other. You will find this a little to the right of the plus icon that you clicked previously. You should then find all the blocks placed on the page. Now search for the created block of the model viewer and confirm the editing with a click. The viewer should now be highlighted in your preview page. If the configuration window has not already opened automatically, please do so by clicking on the button provided for this purpose. You will find this to the left of the Save button at the top right of the navigation bar. At this point, you will once again find all the configuration parameters of the Model Viewer described. All previously described behaviors and values of the options can also be used here, in the Gutenberg editor, in the same way. The height of the viewer can also be specified in the style tab of the editor.
Please note that a live preview of the Model Viewer is not possible in the Gutenberg Editor. Please save your settings first to open the page with the given option and view your scene.
II.III Integration via WooCommerce
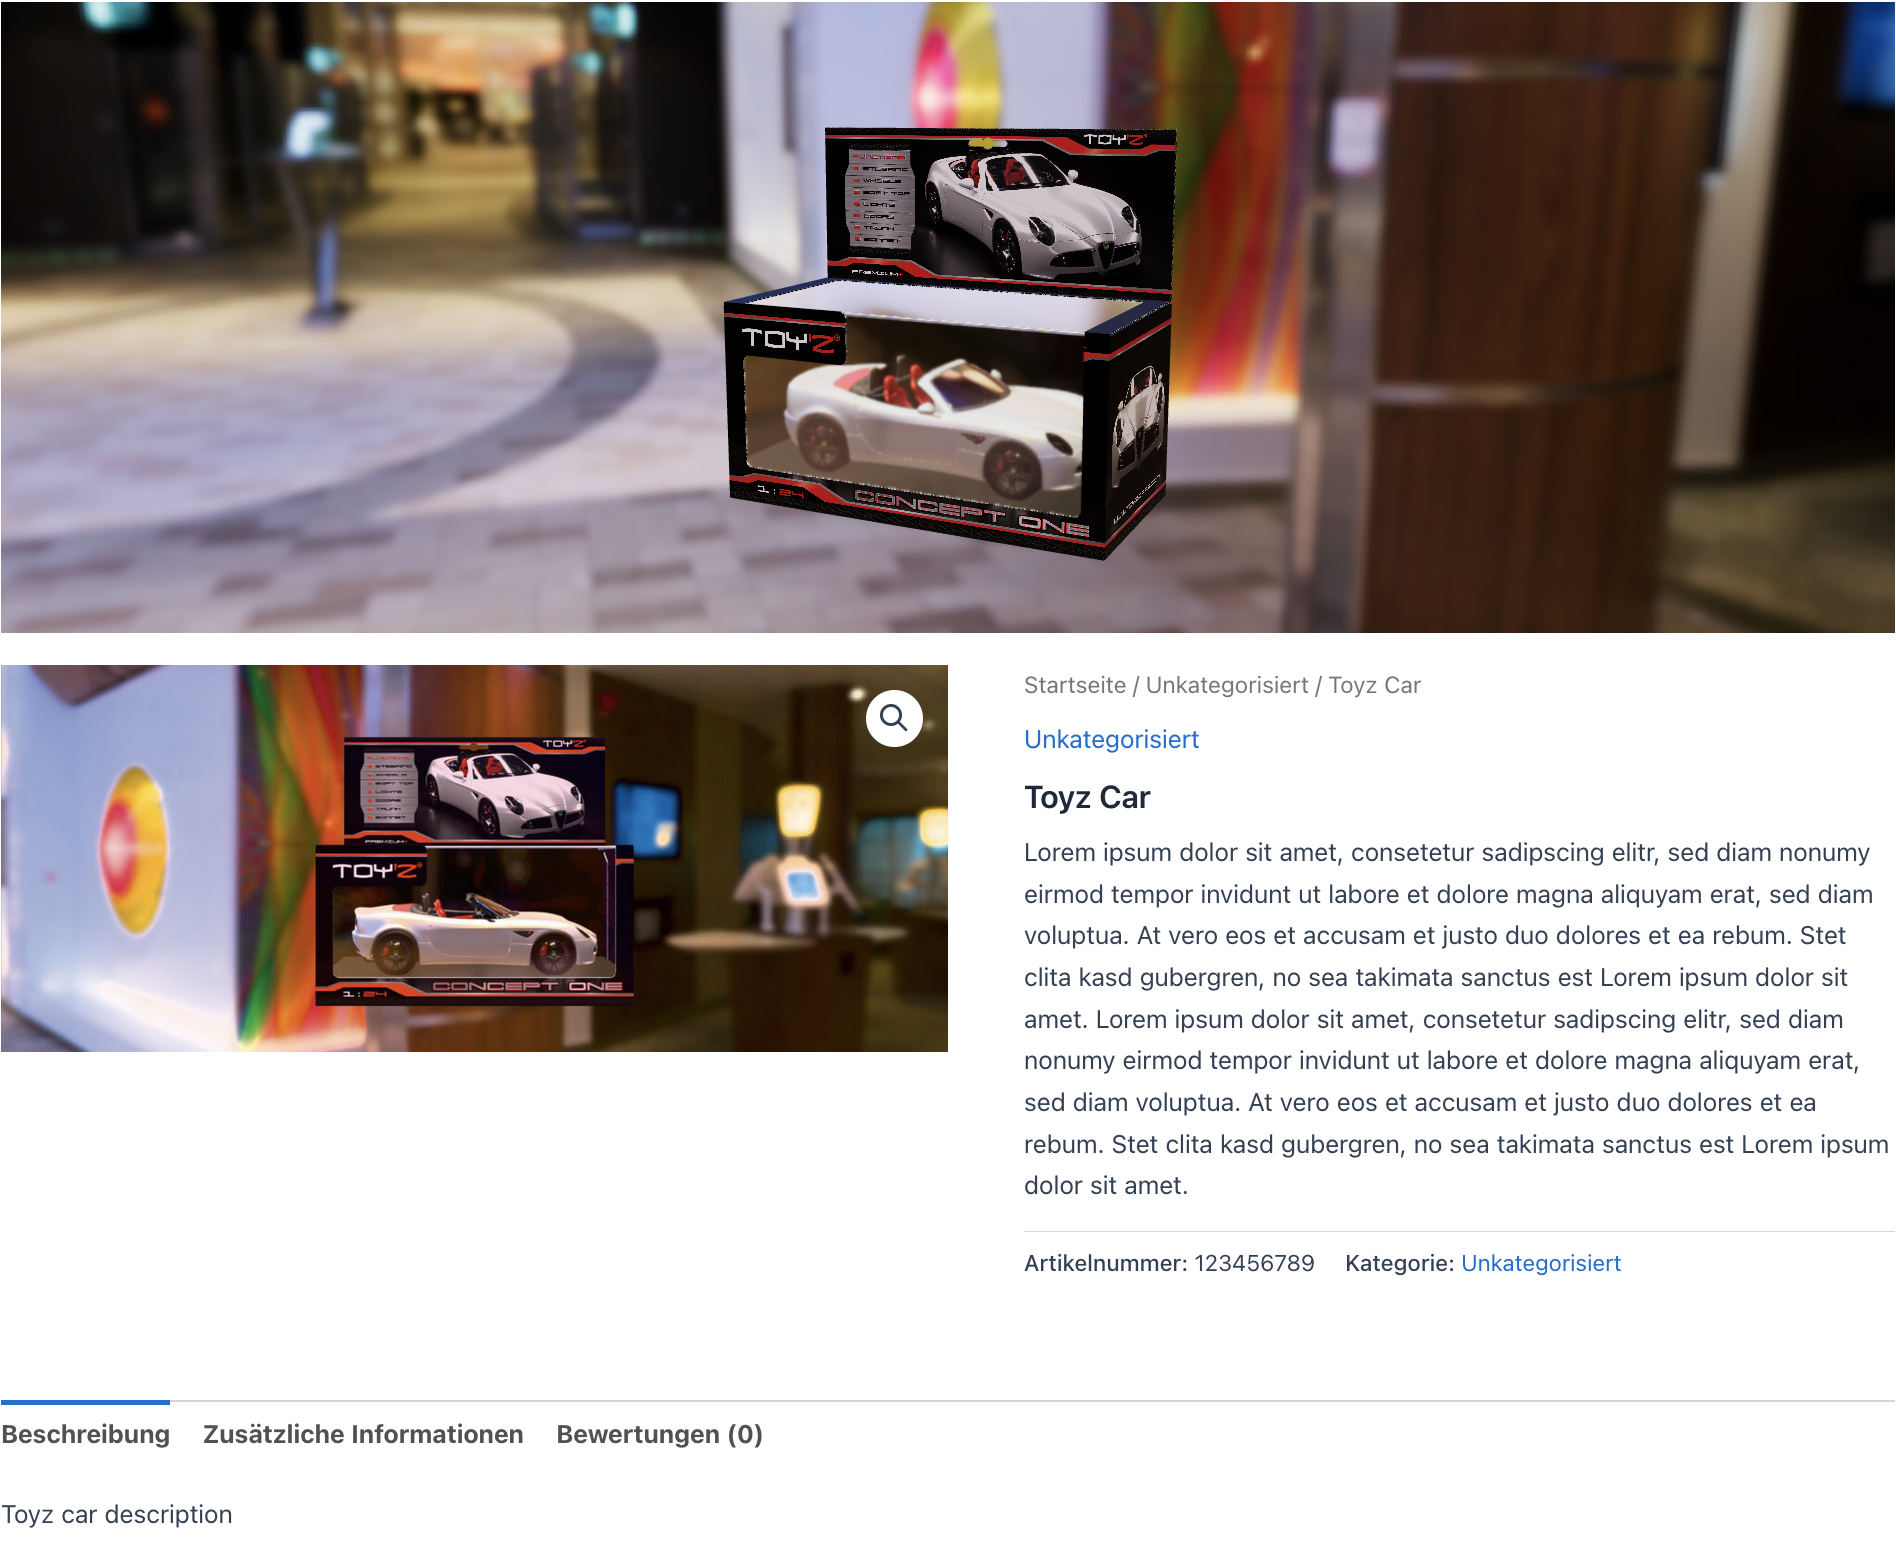
With the Ultimate 3D Model Viewer, you can also provide your customers with the products they want as 3D models. This offers the decisive advantage of giving them a first visual impression of the potential product to be purchased in advance. With the help of the dimension parameter, the actual dimensions of the product can also be displayed. To integrate the desired model into your WooCommerce store, first navigate to the WooCommerce tab in your WordPress backend and click on the tab of available products. Now select the desired product that you would like to present as a 3D model or create a new one of your choice. Once there, you will now find a newly added editing area labeled Ultimate 3D Model Viewer Settings. You may first have to scroll down a little until this appears in your viewport.
The integration of the model works in a similar way to the editors described above. First select your desired model file by clicking on the blue button labeled Select in the Model Viewer Source tab. Then select the desired height of the viewer in the Style tab.
The following configuration area Positioning is special and only included for the WooCommerce application area. By selecting the parameters available there, you determine where the model viewer should be located within your product overview page. First of all, by selecting the display size option, you can reduce the width of the model viewer to half of the page layout. This means that instead of the original full width of the surrounding container, the viewer is only assigned half the width of the container. Depending on the selected display position, this gives you greater scope when designing the product overview page.
You then have five options for positioning the viewer in different places:
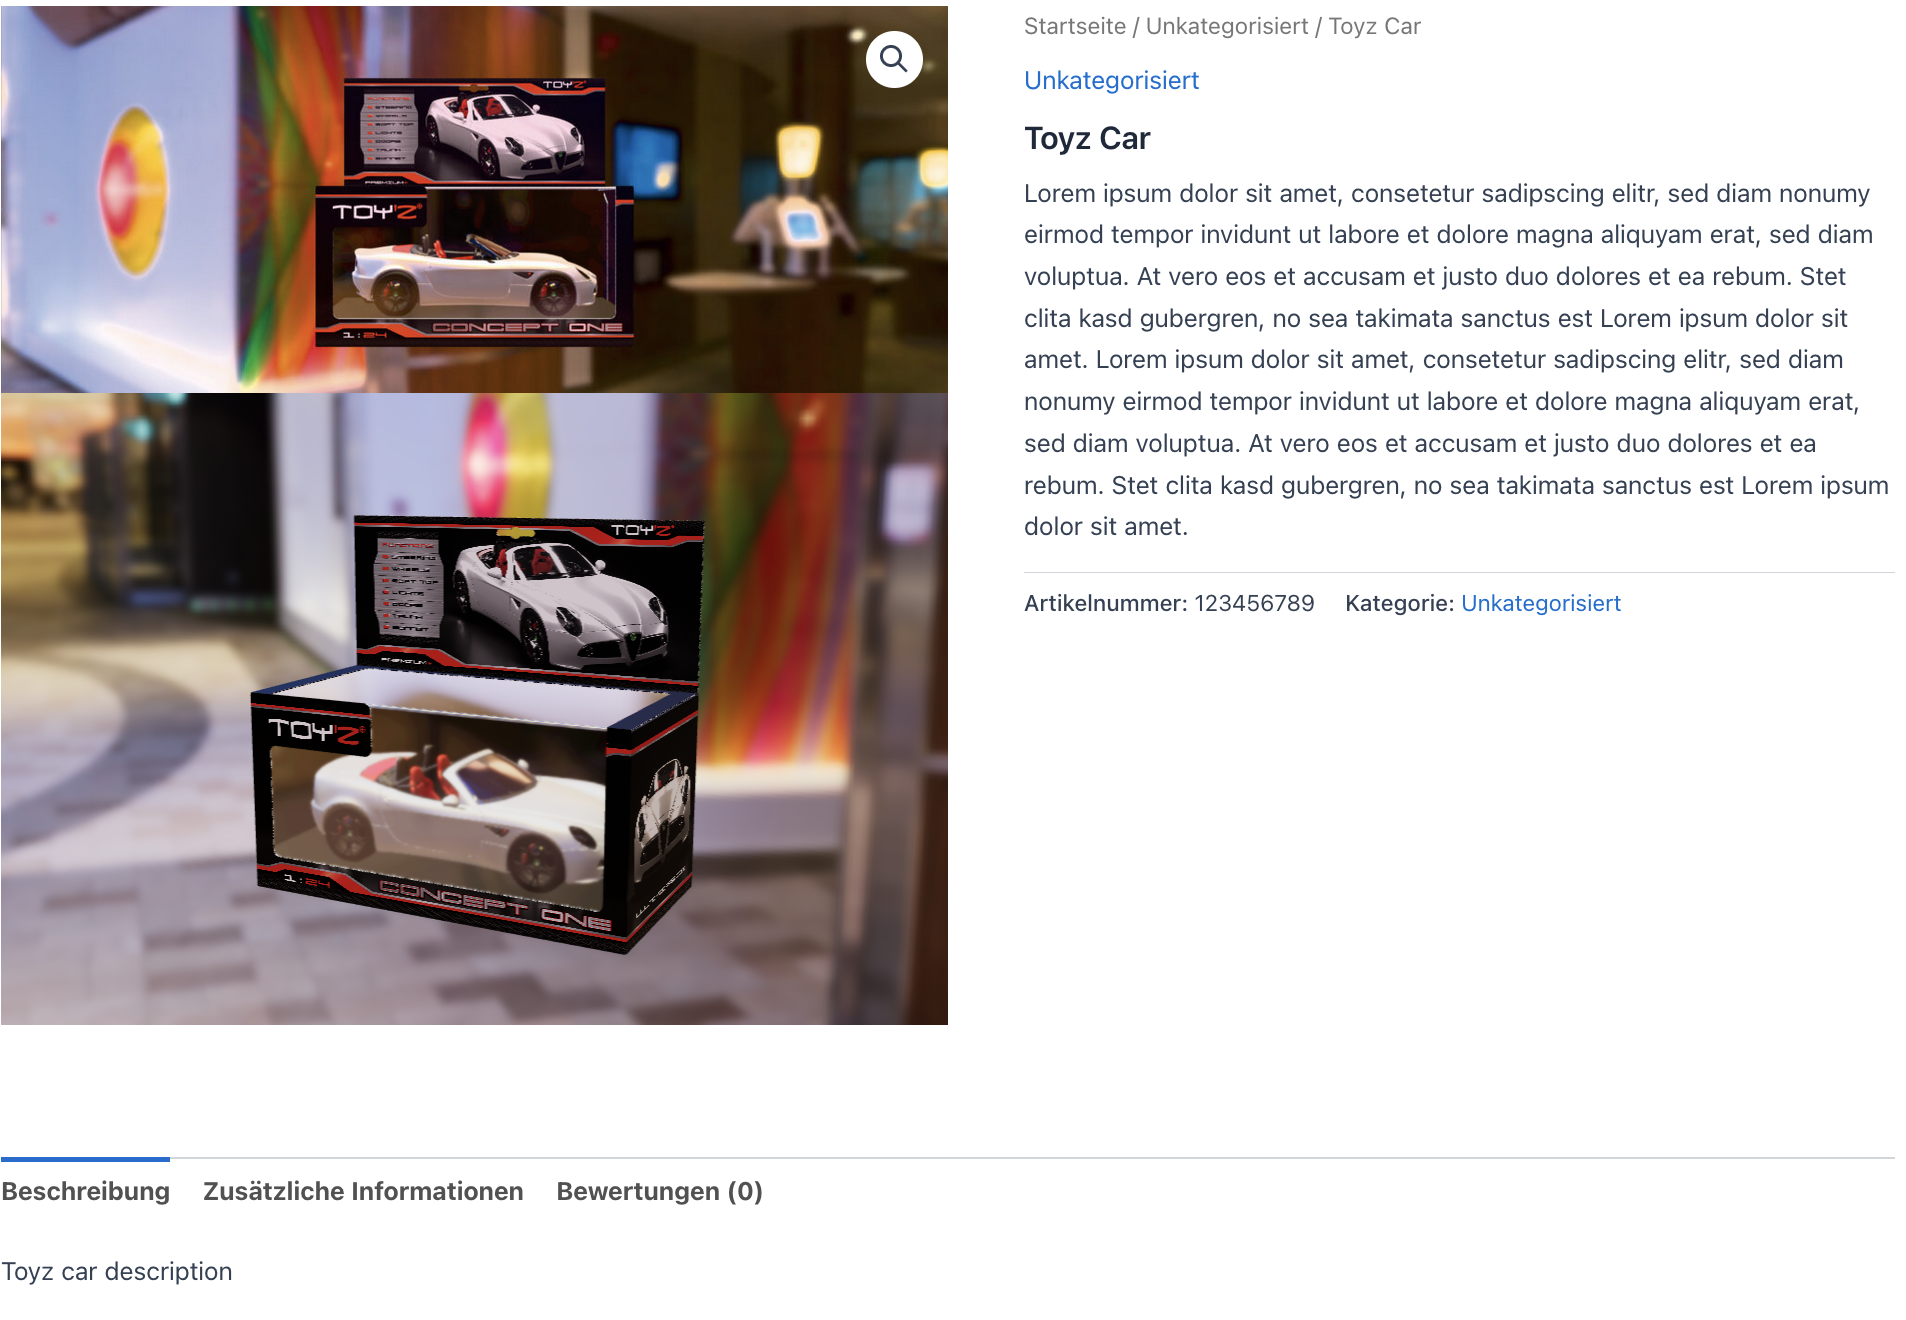
- Above the product image: This option places the viewer above both the selected product image and the corresponding description of the product. So if you have not included any other elements in the product overview before the image and description, the viewer would be the first thing the user sees.
- Below the product image: This option places the viewer below the specified product image, but before the additional product information. The viewer therefore acts as an intermediate element. The position of the product description remains unchanged. The width of the Model Viewer Viewer is automatically reduced by half.
- Right side of the product image: With this option, the model viewer is placed to the right of the specified product image, but still above the description of the product. If you have not reduced the width of the model viewer by half, this will also happen automatically when you select this option.
- Left side of the product image: This option works in a similar way to the previous one. Please note that in this case the selected product image moves to the right and is placed above the product description. Here too, the width of the viewer automatically adjusts to half of the page layout.
- Replace product image with Model Viewer: This is a special option that allows the product image to be completely replaced by the Model Viewer. The viewer takes the same position as the image. Please note that with this option you must adjust the height of the viewer correctly. This means that the viewer takes up an absolute position within the page layout. If the height is not sufficient, the underlying text could protrude beyond the model viewer. Furthermore, this function cannot be used if you decide to use a product gallery instead of a single product image.

The following additional available parameters work in the same way as the editors described above and can be set freely depending on the application. Finally, please confirm all changes by clicking on the Update button. This will make the changes visible in the preview of the product overview.
FAQ
Ultimate 3D Model Viewer is a powerful WordPress plugin that allows you to easily embed interactive 3D models into your website.
The plugin currently supports the following formats:
- .glb (binary glTF)
- .gltf (GL Transmission Format)
- .usdz (for iOS AR compatibility)
Yes! The plugin includes native support for both:
- A dedicated widget for Elementor
- A custom block for the Gutenberg editor
This makes it easy to add and customize 3D models without writing any code.
Absolutely. You can display 3D product models directly on WooCommerce product pages, giving your customers a highly interactive and immersive shopping experience.
Yes, absolutely! We can create fully customised 3D models of your products tailored exactly to your specifications. In fact, we are among the best in this field, with extensive experience and expertise in delivering high-quality, realistic 3D product models. Over the years, we have successfully created numerous bespoke 3D models for our customers, helping them showcase their products in stunning detail and accuracy. If you’re interested, please don’t hesitate to contact us — we’ll be happy to discuss your ideas and bring them to life.
Yes, the plugin is fully responsive and works seamlessly across all modern devices and screen sizes.
You can upload 3D files directly through the WordPress Media Library or via the block/widget interface. Make sure your file is in a supported format (.glb, .gltf, or .usdz) and within your server’s upload limit.
If you’re having issues uploading large 3D files, you may need to:
- Increase upload_max_filesize and post_max_size in your php.ini
- Contact your hosting provider for assistance
Yes, with .usdz models, you can enable mobile AR views on compatible iOS devices.
The Free version includes all core features for basic embedding and viewing. The Premium version unlocks:
- Custom loading screens
- Exposure & tone mapping controls
- Skybox customization
- Shadow intensity and softness
- Precise camera controls
- Advanced lighting
- Smart loading strategies - Full AR compatibility
- ... and more
You can upgrade directly through the plugin settings or by visiting our official site. Once activated, premium features are automatically unlocked in Gutenberg, Elementor and WooCommerce interfaces.
Yes. The plugin is fully localized in English and German, including interface text and documentation.
The Free version can be used on unlimited sites. The Premium license is subject to the terms selected during purchase (single-site, multi-site, or developer license).
For technical support, please contact us.
Reviews