Pslzme Plugin
Table of contents
Installation and operating instructions - CMS WordPress
pslzme (pronounced "personalize me") is a GDPR-compliant and completely secure personalization framework developed by us. It can already be described as a groundbreaking development in programmatic web technology, enabling personalization, individualization, and personalized communication on the web for the first time in a secure and data-efficient manner.
Our system is designed in such a way that all information is packed into a simple link using the highest security measures at different security levels. It is so secure that even our system does not know your data and we cannot track it either. At no point does unencrypted data transmission and storage take place. We work exclusively with personal data that you have voluntarily published. There is no tracking based on your data, nor is there any profiling. Pslzme decrypts and processes your personal data only and exclusively if you expressly allow us to do so.
The installation, configuration, and operation of the pslzme plugin functions are explained in detail below.
I. Installation
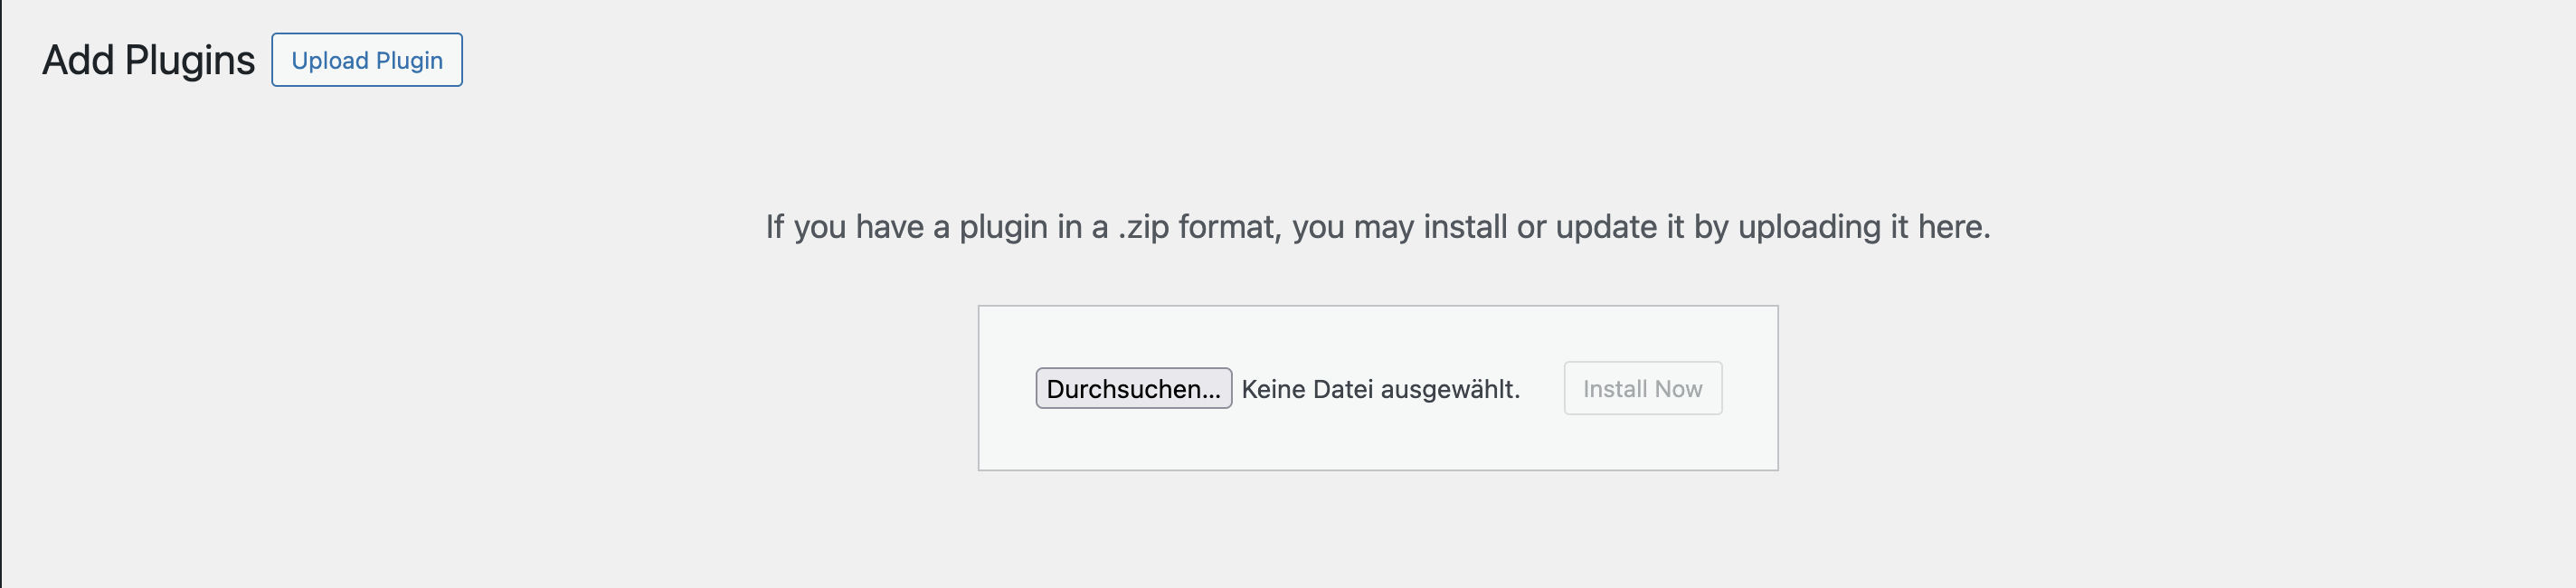
If you do not yet have the plugin, you can purchase it via the current page in the Login/Contact menu section, or via the portal provided at the end of this documentation. If you choose the former option, please fill out the form fields provided there with an attached message requesting the purchase of the plugin. We will then contact you to send you the necessary files. To integrate the plugin into your own website, please first navigate to the Plugins menu in your WordPress admin panel. Then click on the Add Plugin button at the top of the page. This will navigate you to the plugin manager used by WordPress. Here you have the option to add and install new plugins to your website. Please note that our pslzme plugin for the WordPress content management system cannot be found using the search bar due to the fact that it is self-managed and must therefore be integrated via zip upload. You will receive this file from us after purchasing the pslzme plugin. In the next step, please use the Upload Plugin button located at the top of the Plugin Manager. This should bring up a selection area for ZIP files. After clicking on the Browse function, select the provided zip file and confirm the upload by clicking on the Install Now button. The installation usually takes a few seconds. Finally, confirm the activation of the plugin by clicking the Activate Plugin button, which is automatically displayed after each plugin installation.

II. Configuration
After completing the installation, various configuration steps are required to use the functionality.
II.I Configuration of the database and the pslzme cookiebanner
A new configuration area called "PSLZME" has been implemented in your WordPress admin panel. Open it by clicking on the corresponding menu.

This opens a configuration module that provides various options for setting up the database and the pslzme cookiebanner.
It is essential that you carry out the following steps in the specified order. Precise instructions can also be found in the module itself, in the detailed description.
II.I.I Configuration of the pslzme database
To use pslzme successfully, you need to set up a separate, independent database that is not identical to the database on which your current WordPress installation runs. To create this, you need to log in to your server hosting tool. From there, navigate to the "Databases" section. Then select the "Create new database" option and enter the desired configuration data for the database name, user name, and password. Ideally, a database user should be created before the database is created. However, it is also possible to perform this step later and assign the database user accordingly. To create a user, please navigate to the "Database Users" section. In this area, the necessary configuration data, such as the user name and password, are created. After successful creation, the created user must finally be assigned to the database, if this has not already been done. In order to communicate with the pslzme database, a connection to the plugin is required. In step 2 of the module, three fields are provided for this purpose to enter the database name, user name, and password.
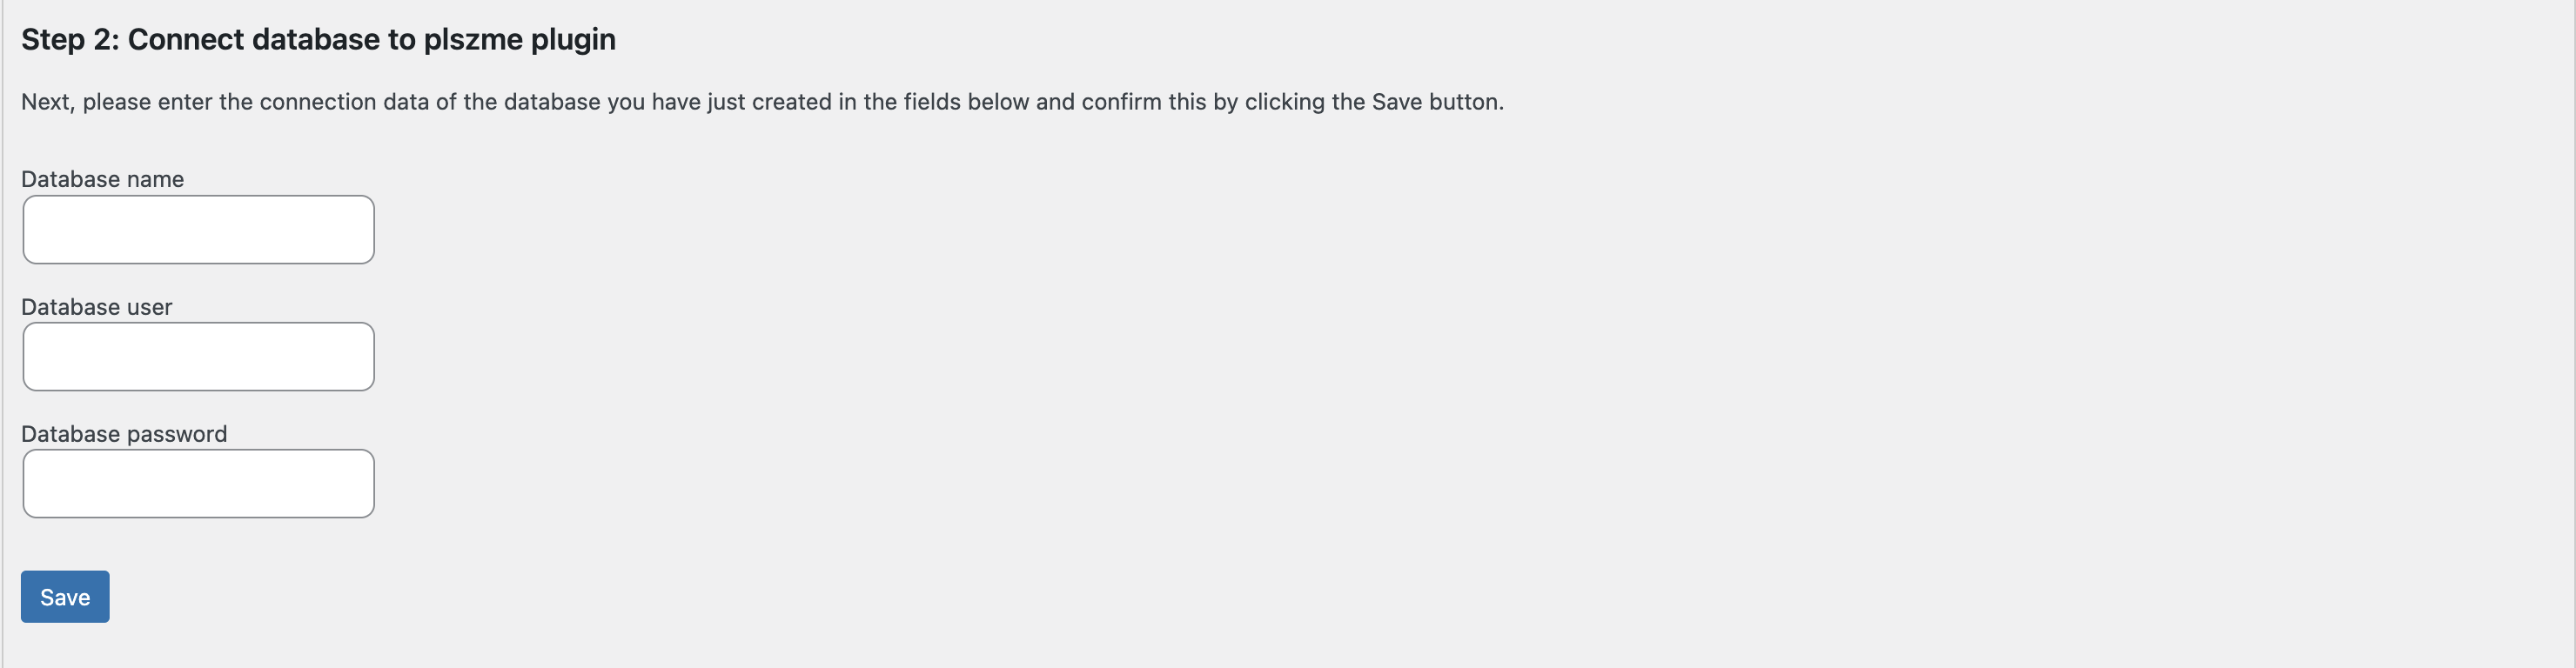
Enter the data for the newly created database there and then confirm by clicking the Save button. Provided that your database details are correct, you should now see the name of the database and the database user in the "Database Name" and "Database User" fields provided. In the next step, the required pslzme database tables are created. The process of creating the tables is fully automated. To do this, please confirm by clicking the "Configure tables" button in step 3.

II.I.II Licencing of the domain
The use of plszme is commercial. Therefore, a license for your domain is required for use. Please note that the plugin cannot be used without the appropriate license. If you do not yet have a pslzme account, you can also request one in the Login/Contact menu area. As a rule, the account will be provided by us when you first contact us to purchase the plugin, unless you request otherwise. Once your account has been set up, please confirm by clicking on the "Register domain" button to license your current domain.

After successfully registering your domain, the buttons text should change to "Domain successfully licensed".
II.I.III Linking internal pages to the pslzme cookie banner
As already mentioned, pslzme is fully GDPR compliant. This means that the functionality of the plugin is used exclusively on the basis of the consent of the target visitor to the website. The visitor must therefore confirm that they agree to their data being viewed in personalized form on your website. Pslzme provides a special cookie banner to obtain consent. Among other things, this uses internal links to your website's legal notice and privacy policy. To ensure that internal redirection works smoothly, it is necessary to specify the ID of the respective pages in the configuration module. Please navigate to the "Pages" menu item in the WordPress admin panel to find the ID. Navigate to the corresponding legal notice or privacy policy page and hover your mouse over its name. You should then see a link in the lower left-hand corner of your screen. This should be structured as follows: https://www.meineurl.de/wp-admin/post.php?post=511&action=edit. The number after the post parameter entry corresponds to the ID of your page. In the example, the ID would therefore be 511. Please enter both IDs from the legal notice and privacy policy pages in the fields provided in the "Internal Pages Configuration" menu item in the pslzme configuration menu and then confirm them again by clicking on the "Save" button.
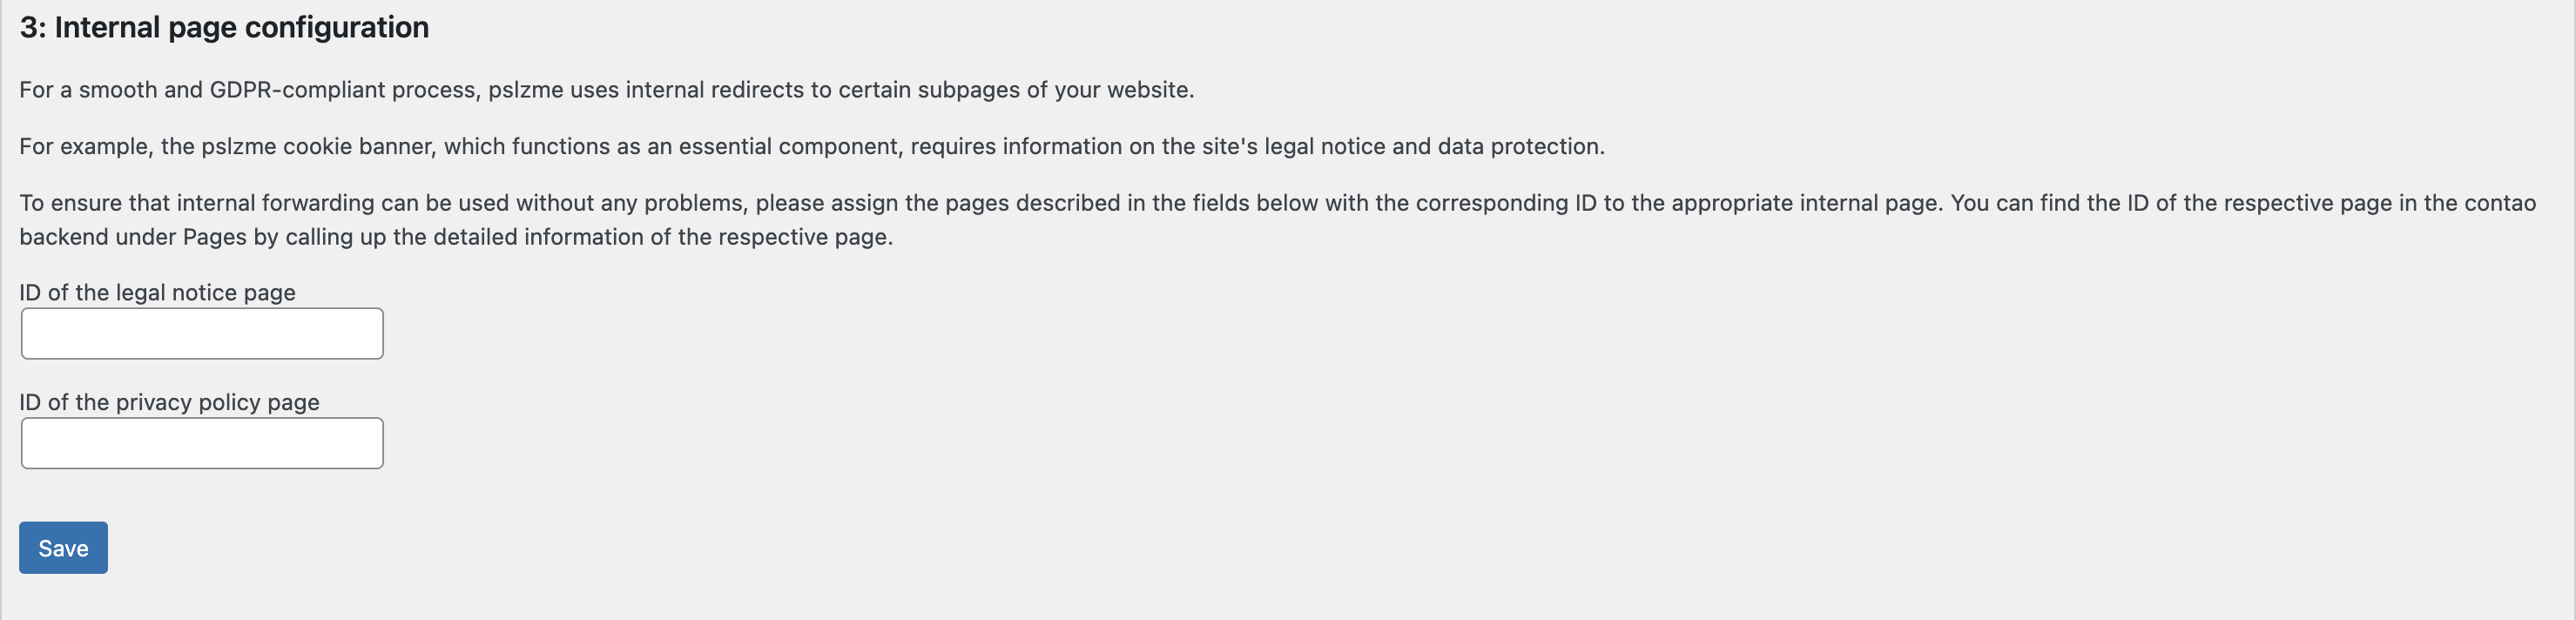
After confirmation, the respective IDs of the pages should be displayed in the following fields: "ID of the legal notice page" and "ID of the privacy policy page".
III. Usage
III.I Creation of the pslzme link
III.I.I Creation via single link option
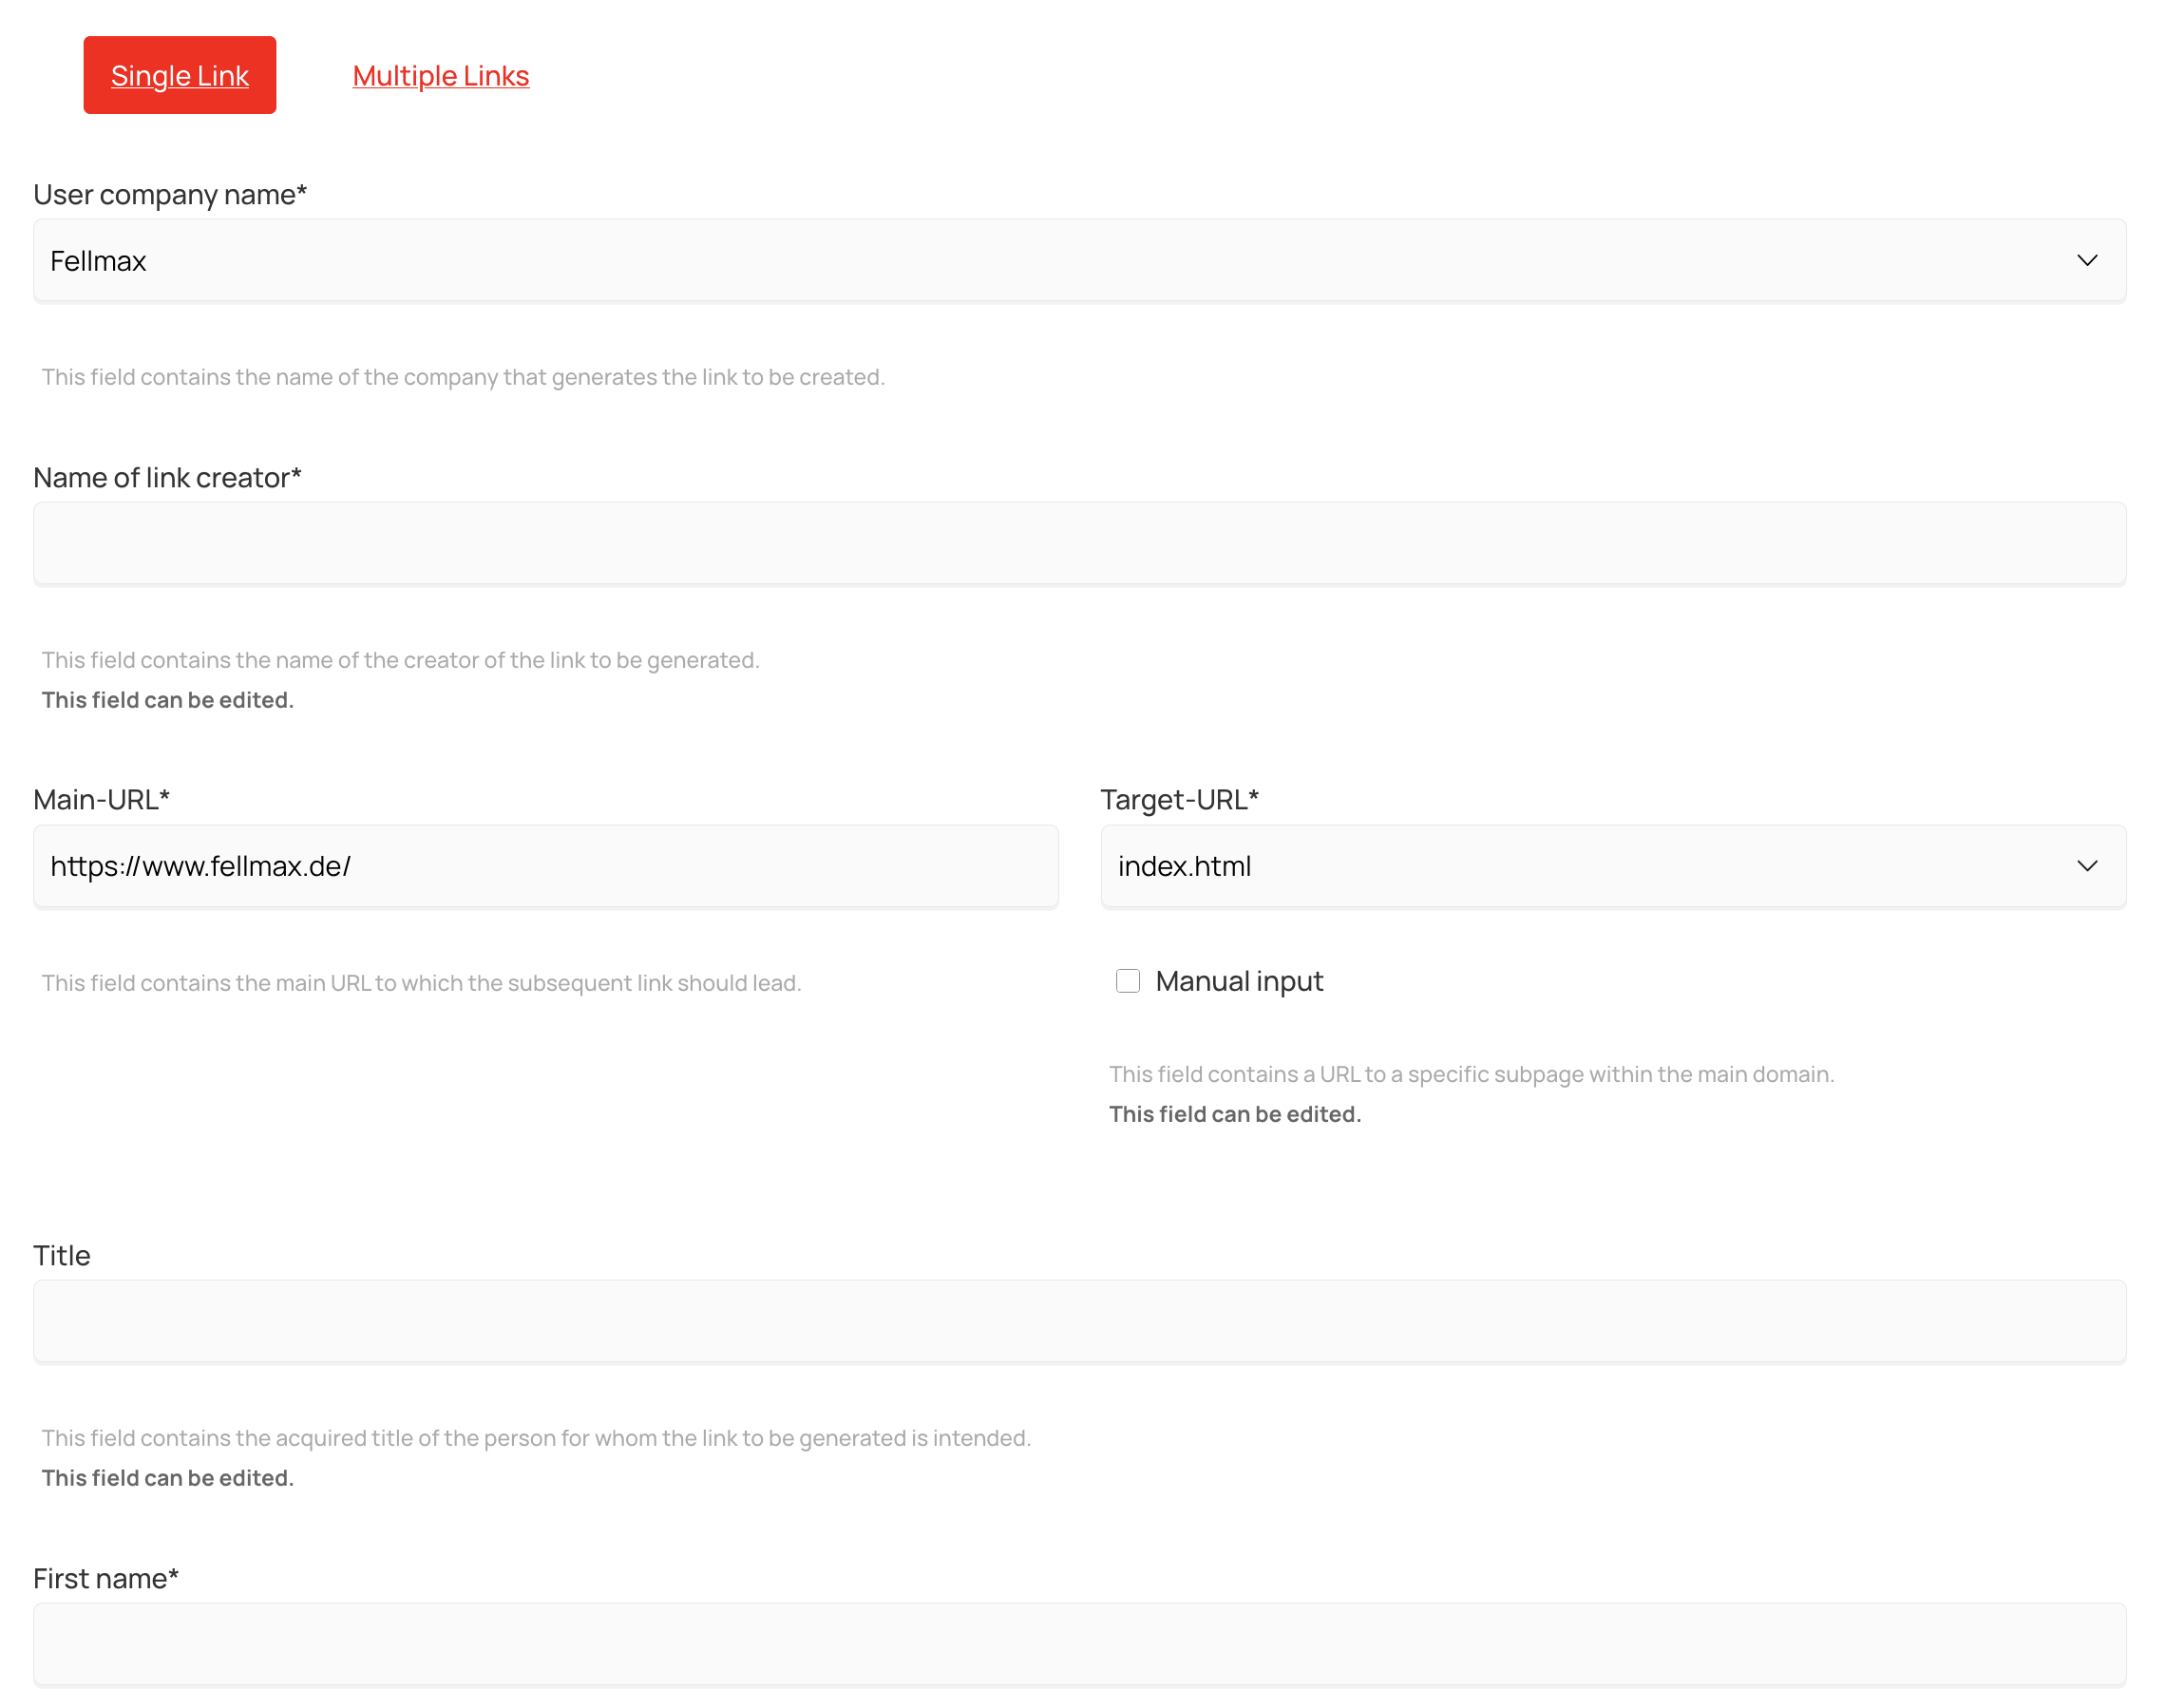
You now have the option to personalize your page for different visitors as you wish. This is done using special pslzme links. These links are tailored specifically to the respective visitors, contain the desired personalization, and are appended to your URL domain. To create these pslzme links, please navigate back to the "Login/Contact" menu item on the pslzme.com website. This time, please log in to the "pslzme Login" area using your existing account. Then navigate to our link generator, which can be found in the navigation bar under the menu item "Generator > Link Generator." There you will find a special form. This form is used to personalize your website later, depending on the data you enter in it. Please fill in all the required fields on the form. The following explanation describes the individual options.
User company name:
This field displays the name of the company that generates the link to be created. This field is usually already filled in and customized to your company, which was specified when you created your account.
Name of link creator:
This field contains the name of the creator of the link to be generated. If you are creating the link yourself, enter your full name here.
Main-URL:
This field contains the main URL to which the link should lead. This field is also already set with your domain name, which was also specified when you created your account.
Target-URL:
This field contains the URL for a specific subpage within the main domain. When creating your account, you also have the option of specifying various pages on your website that you would like to personalize. Once you have specified these pages, you can select them in this field. Alternatively, you can also enter one of your pages manually. To do this, please use the "Manual input" option. Please note that this must be a URL that exists under your base domain. You cannot specify pages that are outside your base domain.
Title:
This field contains the title acquired by the person for whom the link to be generated is intended. If you are personalizing your page for someone who has a doctorate, for example, you can enter this title here.
Fistname:
This field contains the first name of the person for whom the link to be generated is intended.
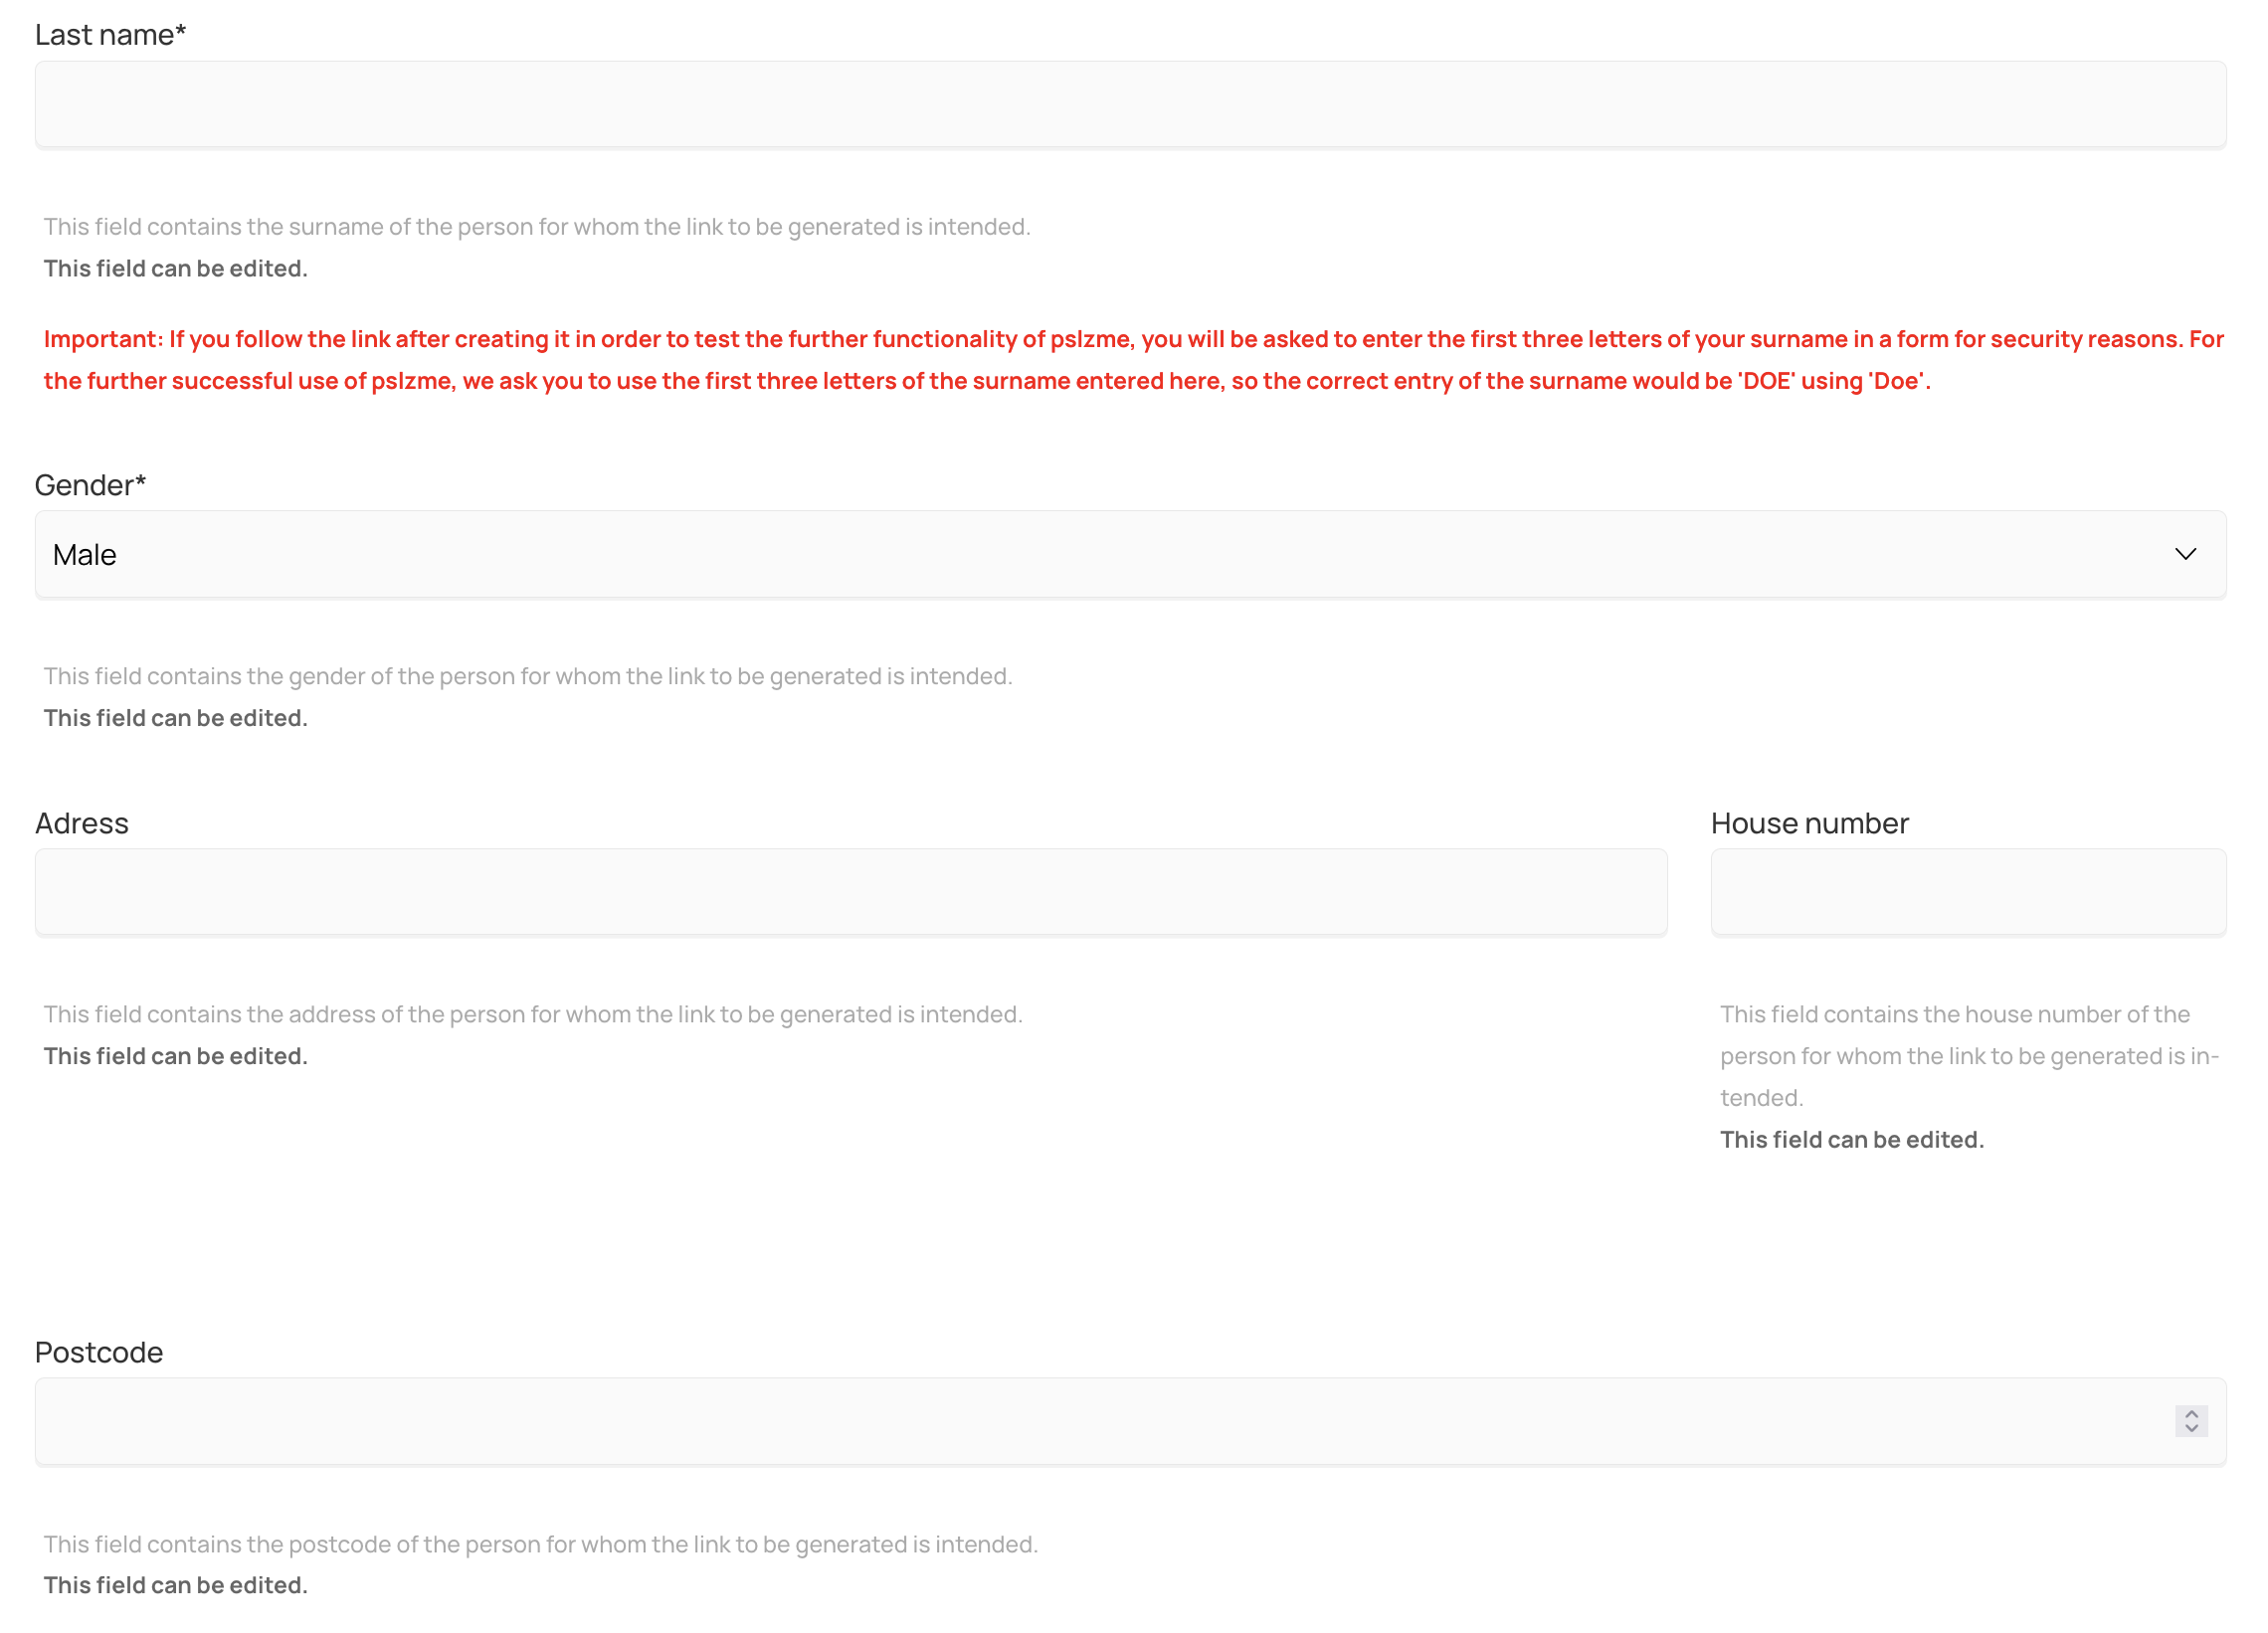
Lastname:
This field contains the last name of the person for whom the link to be generated is intended.
Gender:
This field contains the gender of the person for whom the link to be generated is intended.
Addresse:
This field contains the adress of the person for whom the link to be generated is intended.
House number:
This field contains the house number of the person for whom the link to be generated is intended.
Post code:
This field contains the postal code of the person for whom the link to be generated is intended.
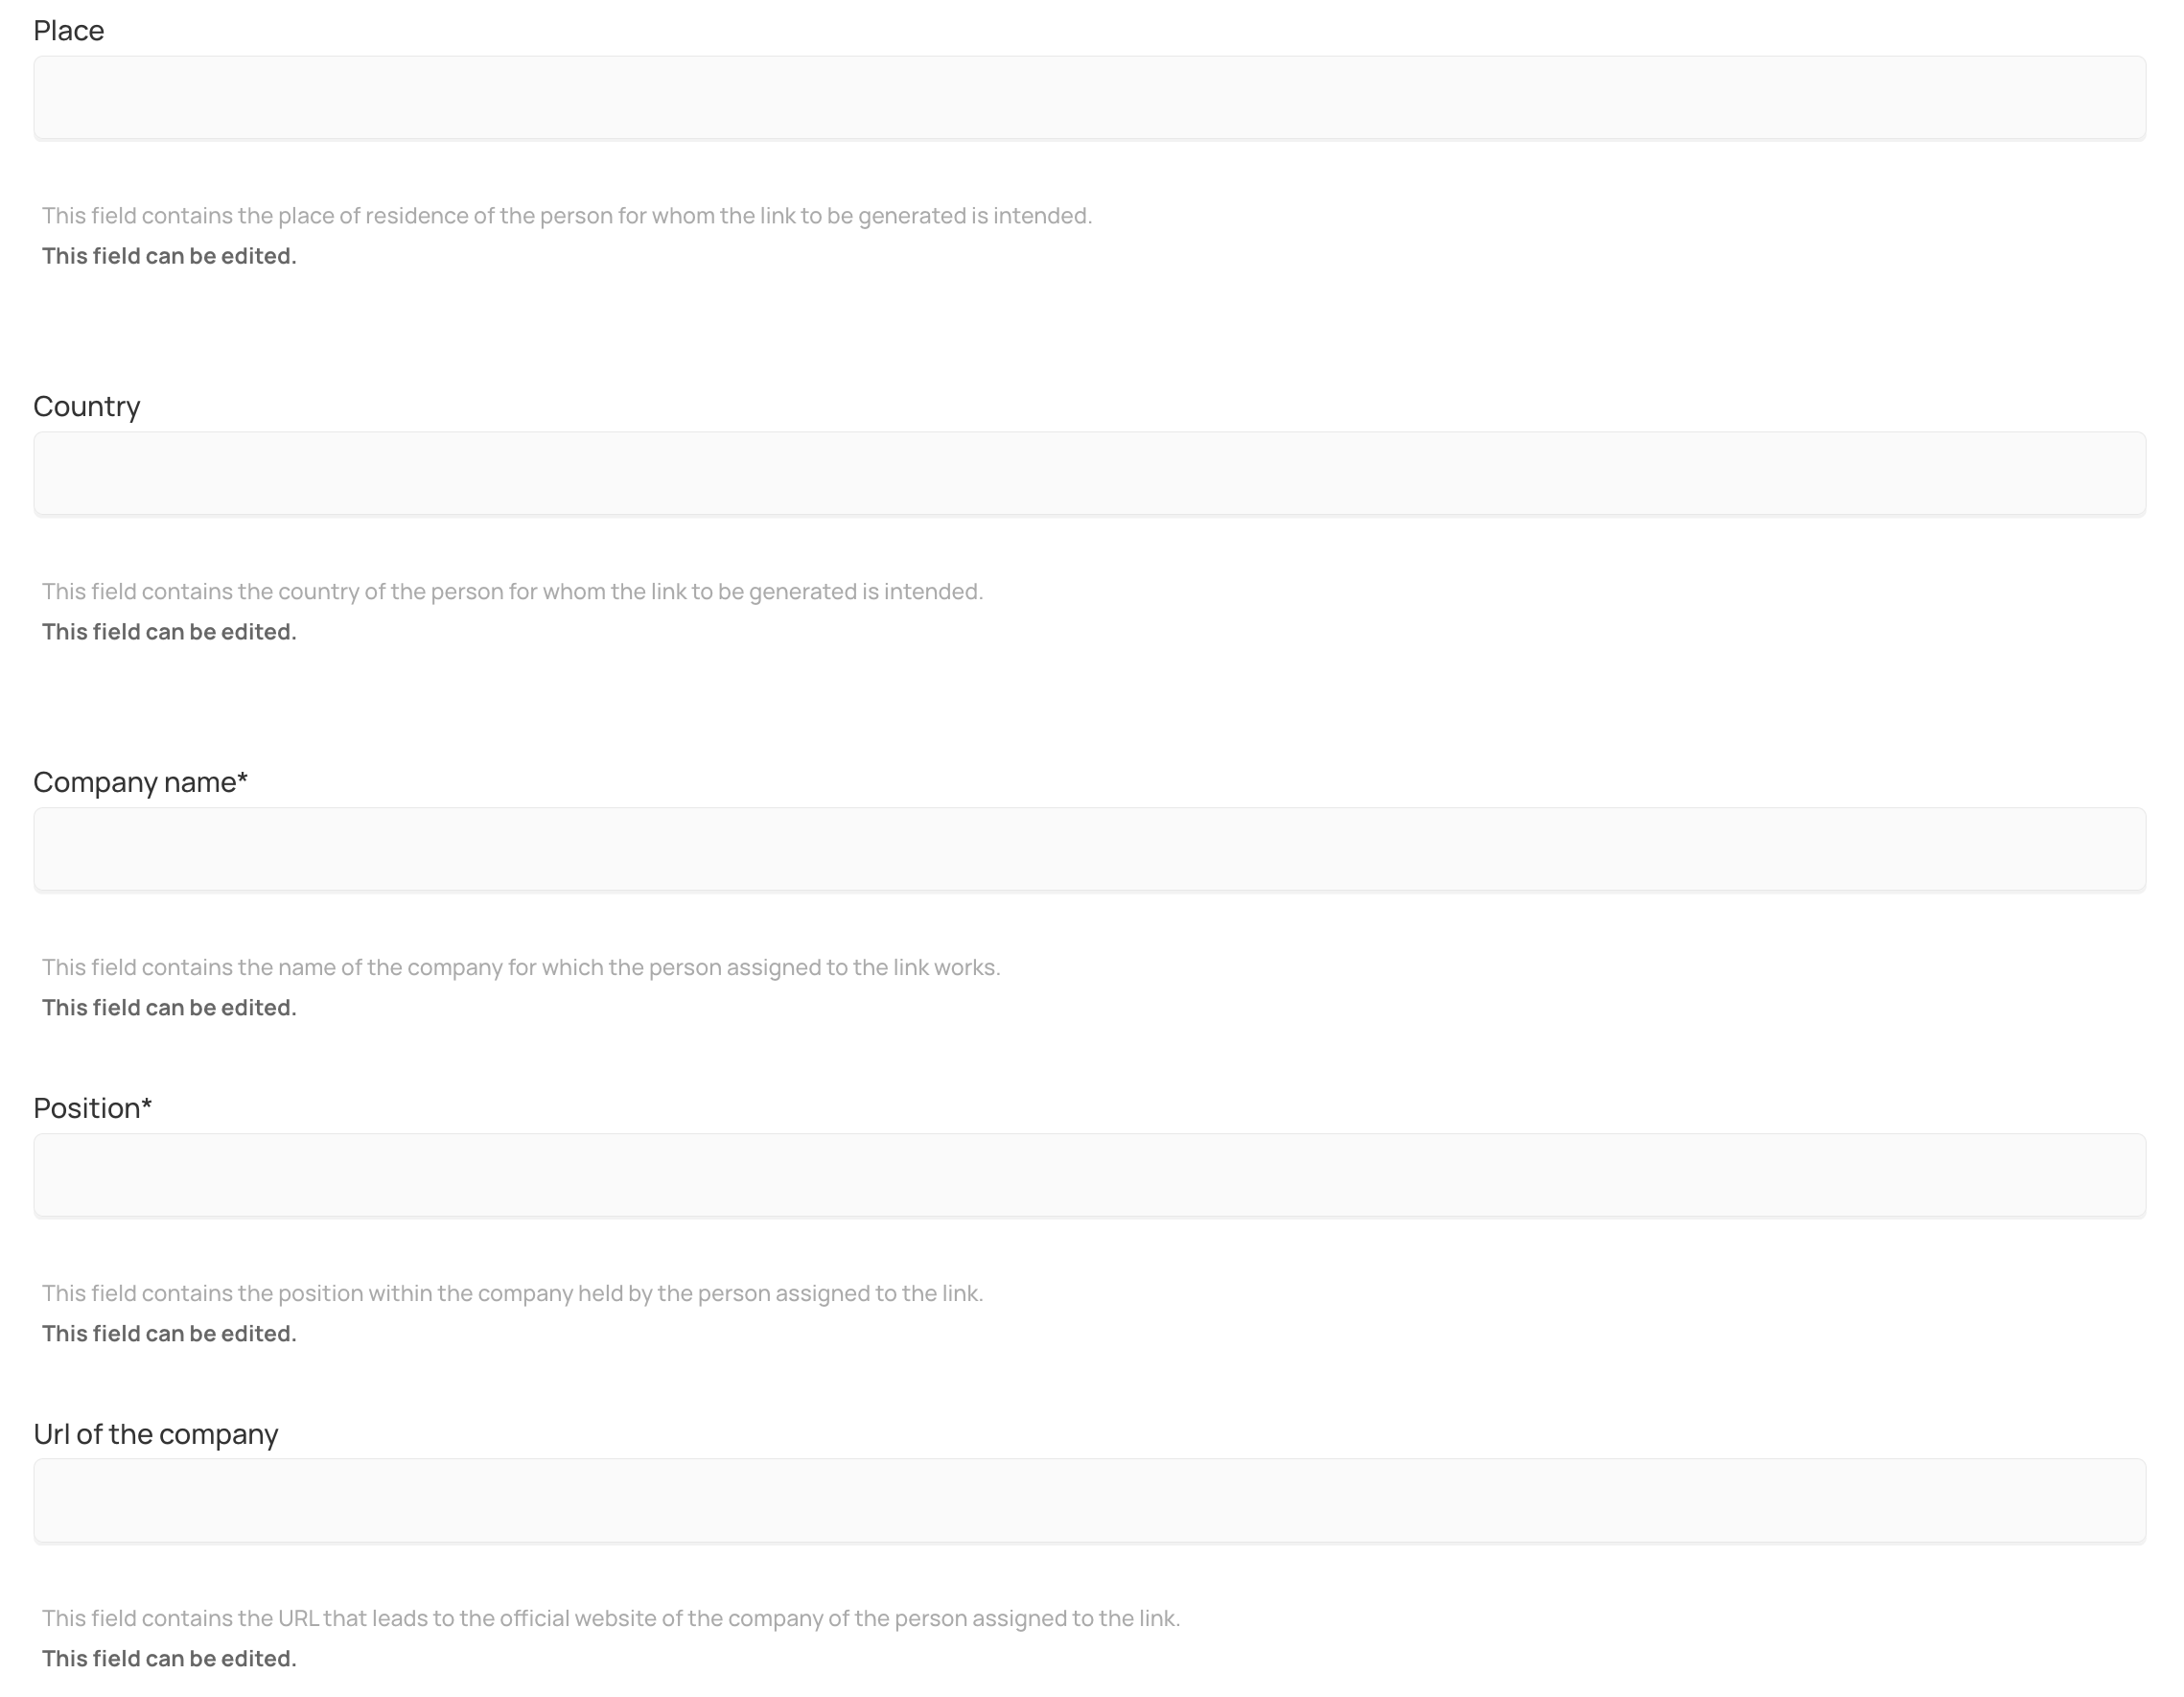
Place:
This field contains the city of the person for whom the link to be generated is intended.
Country:
This field contains the country of the person for whom the link to be generated is intended.
Company name:
This field contains the name of the company for which the person assigned to the link works.
Company gender:
This field contains the gender of the company for which the person assigned to the link works.
For personalization to work successfully, different cases (dative, accusative, genitive, nominative) are used in German, which change the gender of the word depending on the sentence structure. For correct usage, it is necessary to know the gender of the word to be changed. In this case, the gender refers to the company.
Position:
This field contains the position within the company held by the person assigned to the link.
Url of the company:
This field contains the URL that leads to the official website of the company associated with the link.
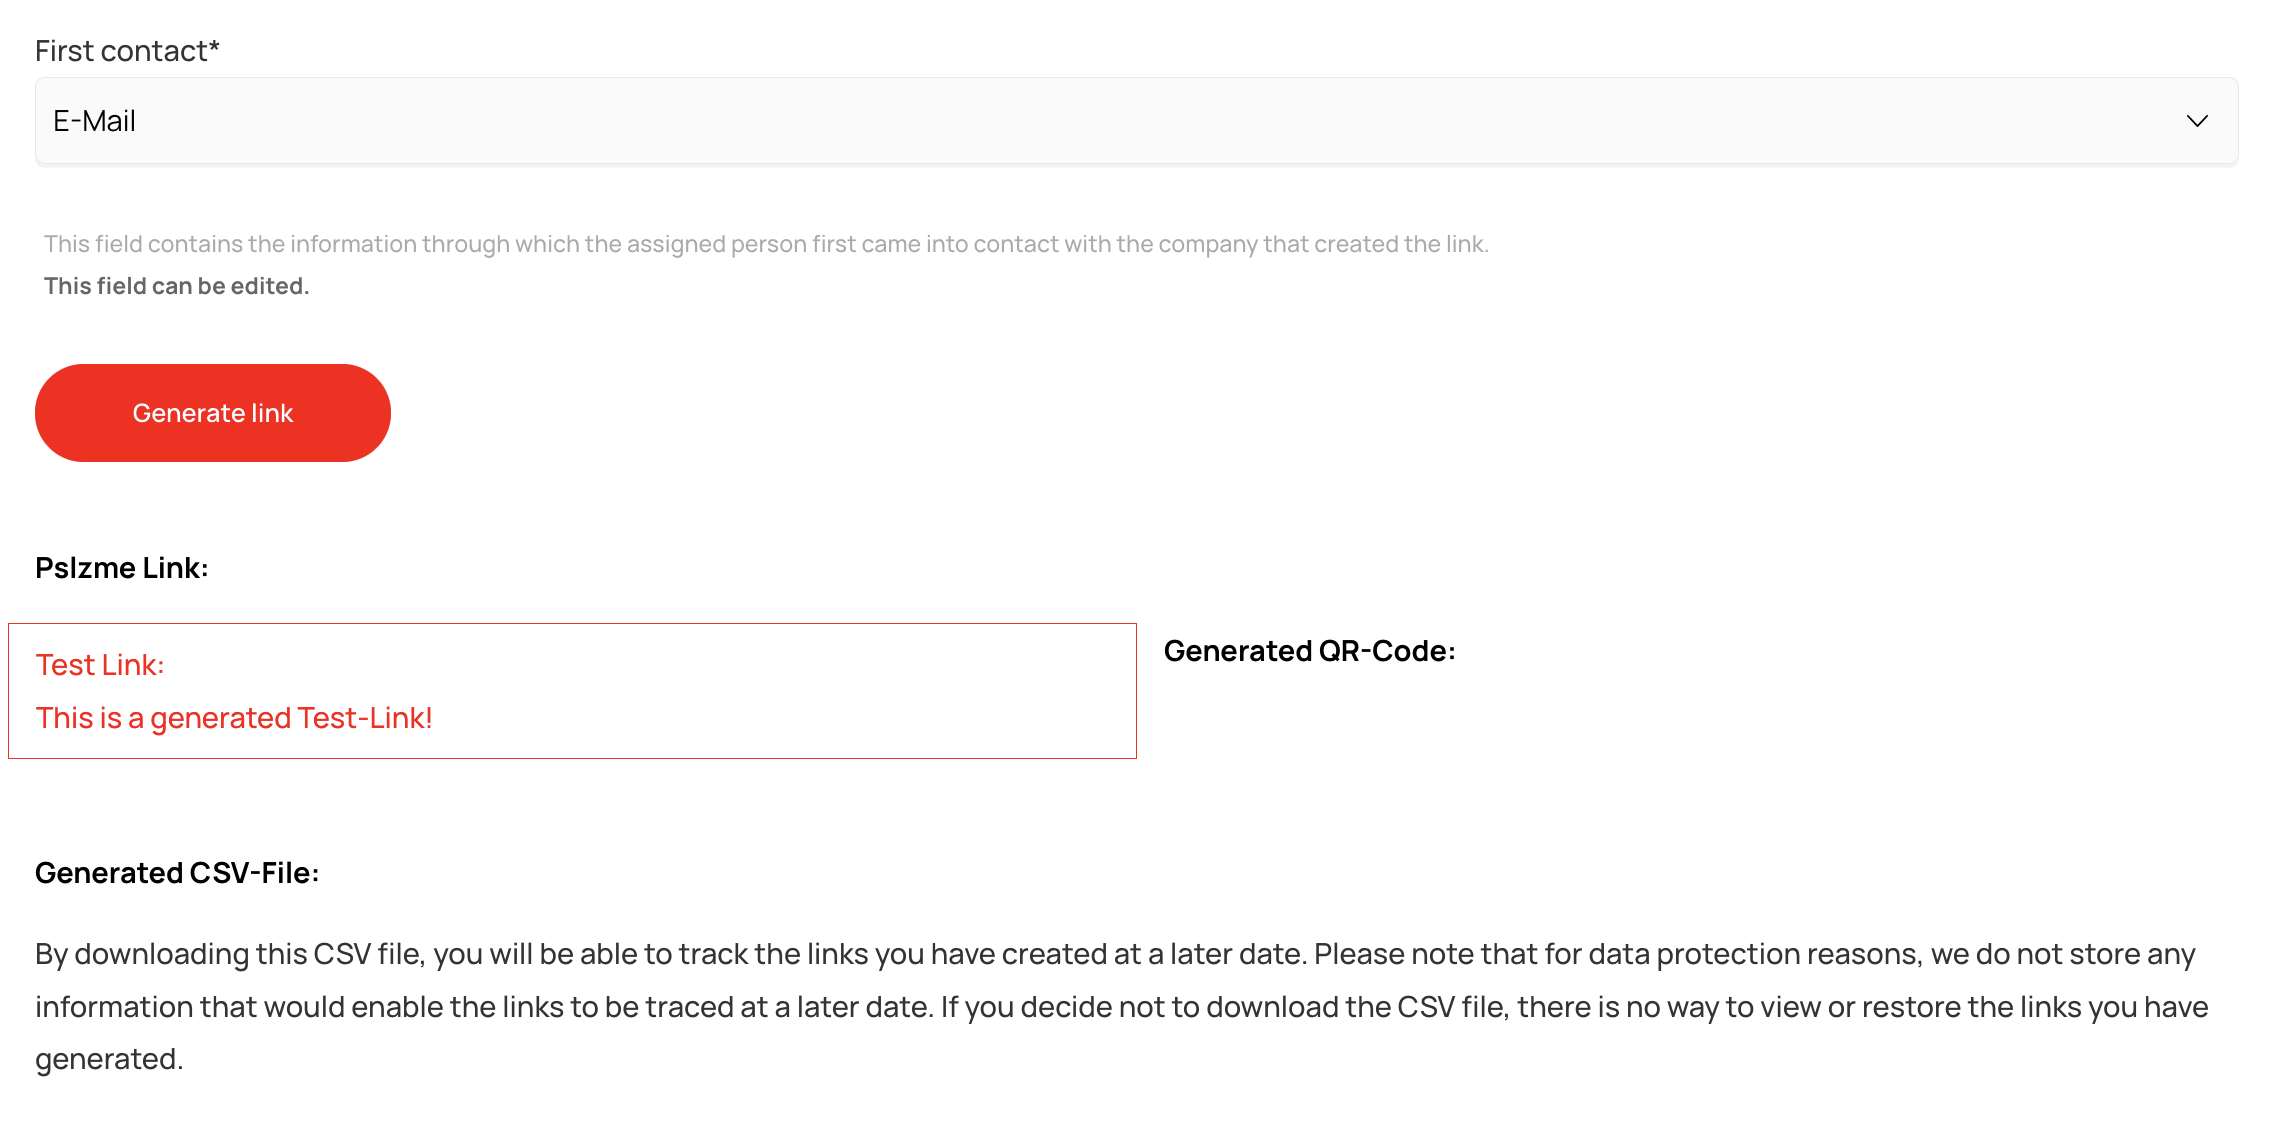
First contact:
This field contains information about how the assigned person first came into contact with the company that created the link. For example, if you contacted someone via a social media channel such as LinkedIn and would like to show that person your personalized website, please select the LinkedIn option here.
You will also find a detailed description of the fields under each of the fields in the "Link Generator" menu area. Finally, click on the "Generate Link" button. You will then be presented with three different link options. The first option is the pslzme link. This is used to provide the desired person with the link. The second option is a test link, which is intended for your own use. By following the test link, you will also be redirected to your desired domain. At this point, you have the opportunity to check the functionality of pslzme. The reason for the test link is to ensure GDPR compliance, as mentioned above. This means that it must be proven whether the visitor has agreed to or rejected personalization. If you use the original link to test the functionality, you will no longer be able to prove this for your own website, for the intended visitor. The third and final option is the generated QR code. This can also be forwarded to the visitor. The code can then be scanned to redirect the visitor to the desired website.
III.I.II Creation via multi link option
You still have the option to generate multiple links at the same time. To do this, click on the Multiple Links tab at the top of the form. There you will find an input field that allows you to upload a CSV file. Create this file using any method you choose. Please note that all fields from the single link form must be included in the correct order. The structure of the fields within the CSV file is as follows:
User company name*, Name of link creator*, Main-URL*,
Fields marked with an * must always be specified. If these are forgotten or omitted, your links cannot be generated successfully. Fields without an * can be omitted, but must then also be separated by commas in the correct place. A valid entry in your CSV file using all fields would look like this, for example:
"Alexander Dort GmbH","Max Mustermann","https://www.alexanderdort.com/","leistungen/alle-leistungen.html","Dr.","Otto","Normalverbraucher","m","Musterstraße","1","12345","Musterstadt","Deutschland","Max Mustermann GmbH","f","Geschäftsführer","https://www.myurl.com","E-Mail"
Please note that the gender of the company name must be indicated with "m" for masculine, "f" for feminine, and "d" for neuter.
If the optional fields are not specified, the above link would look as follows:
"Alexander Dort GmbH","Max Mustermann","https://www.alexanderdort.com/","leistungen/alle-leistungen.html",,"Otto","Normalverbraucher","m",,,,,,"Max Mustermann GmbH","f","Geschäftsführer",,"E-Mail"
Combinations in which some of the optional values are used and others are omitted are also possible.
Please note that the maximum number of entries per CSV file is limited to 50.
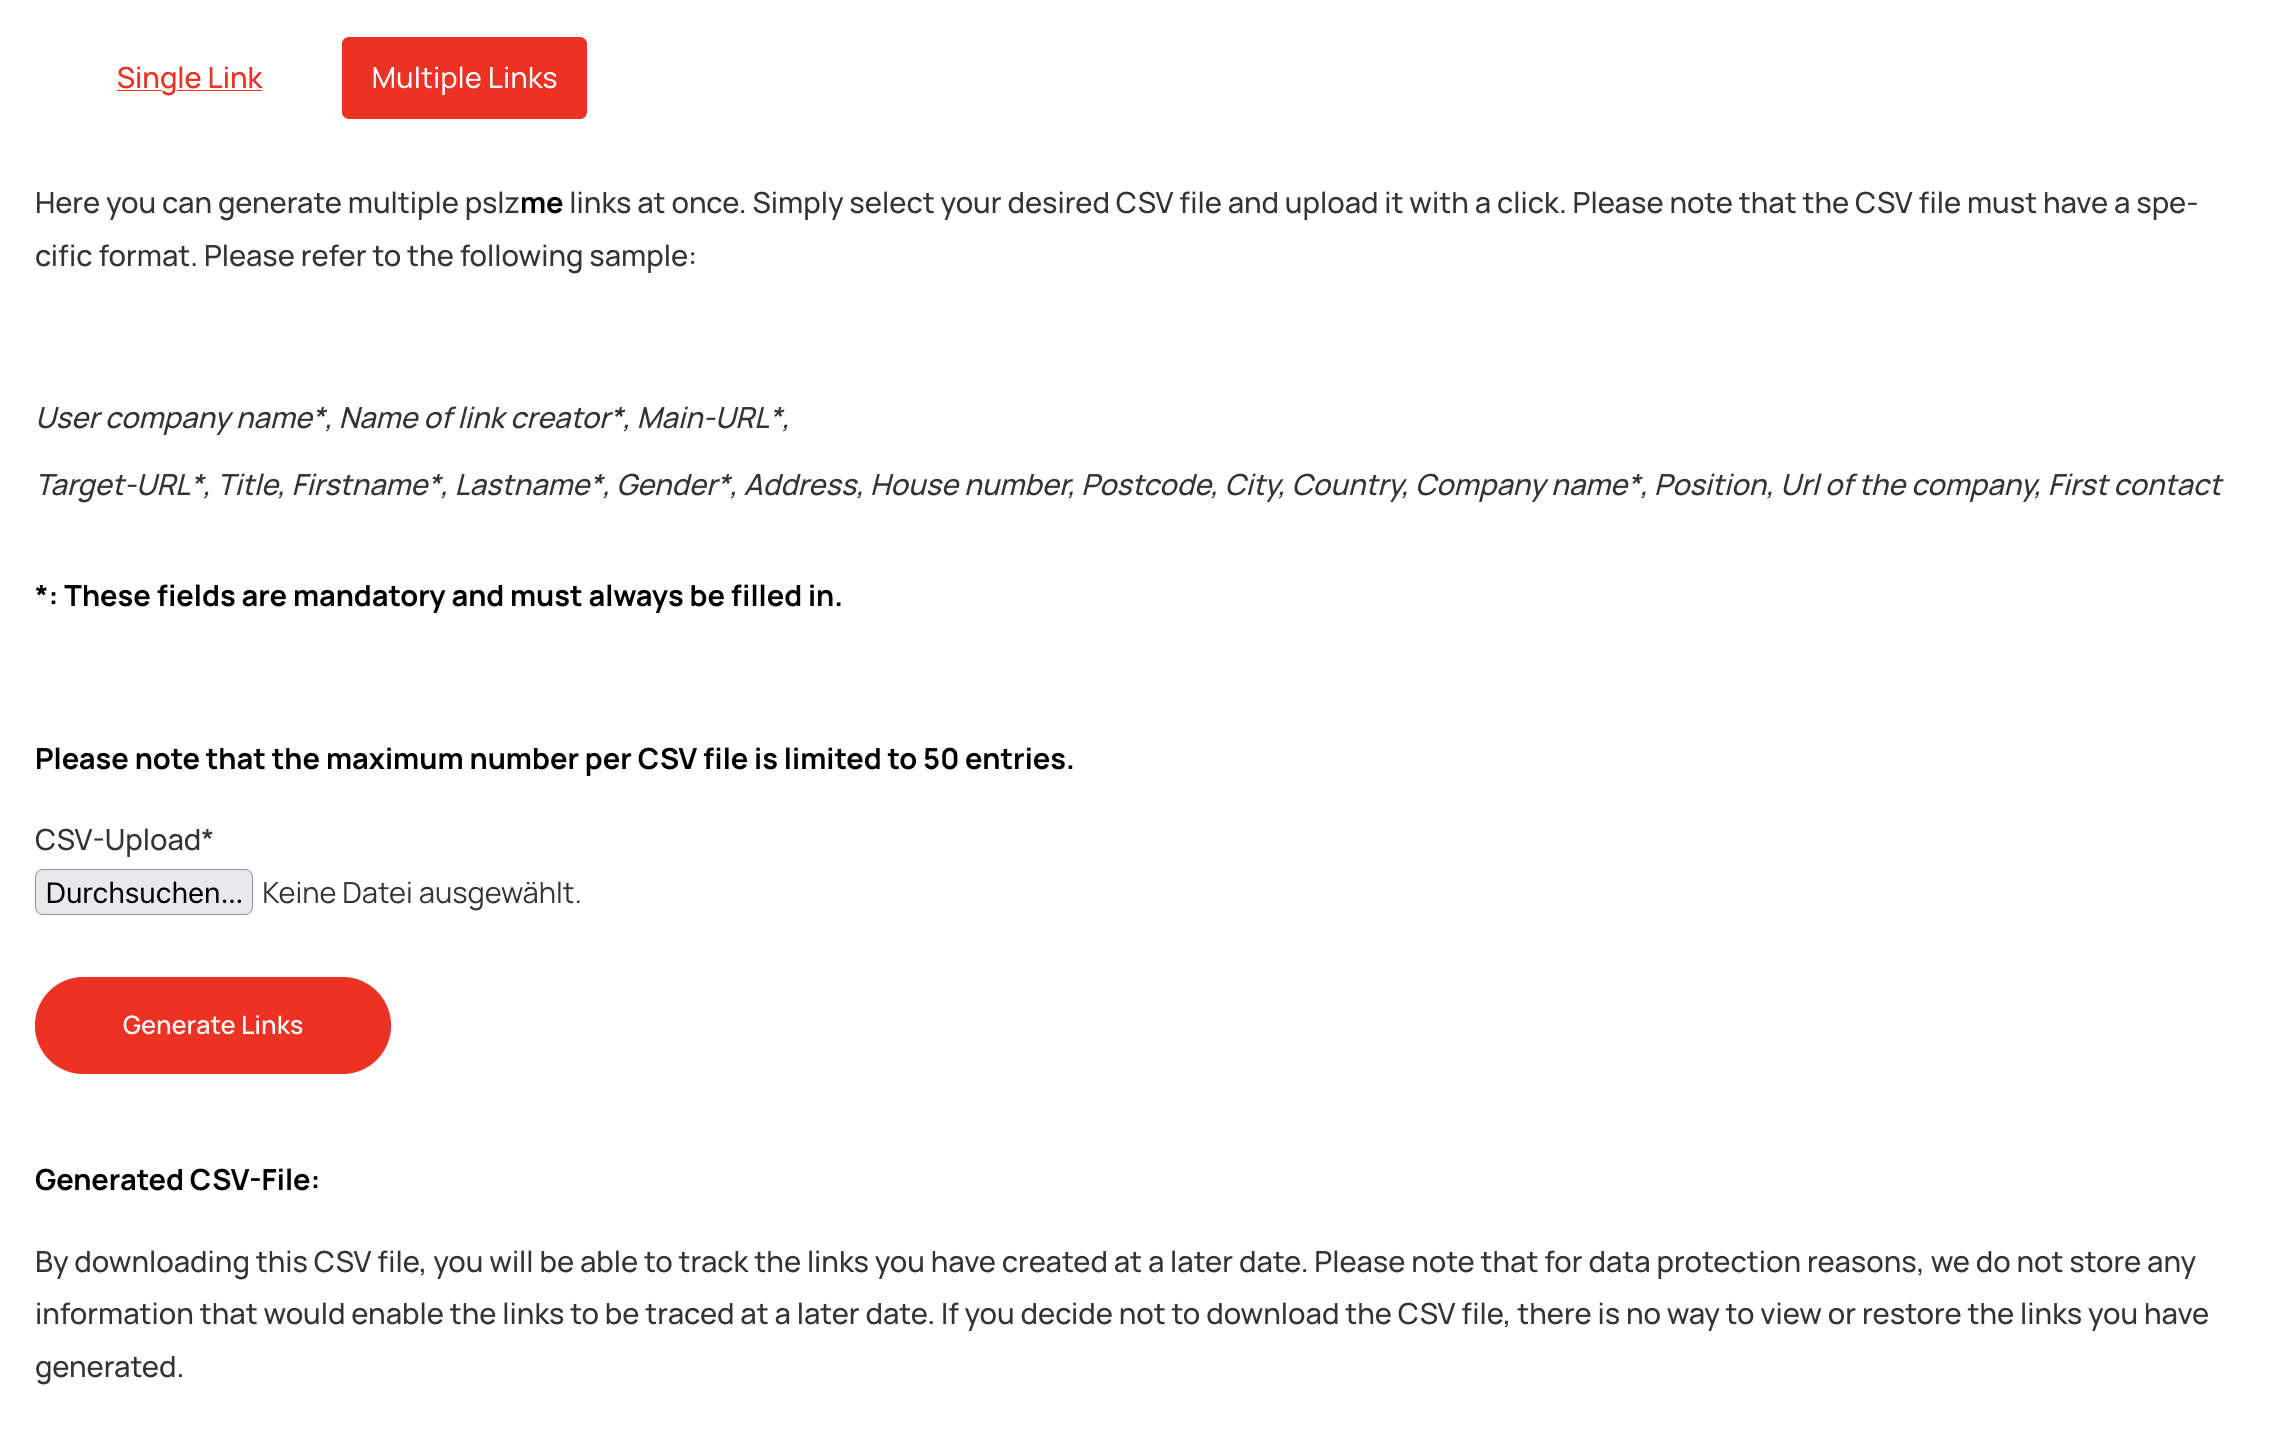
We would like to point out at this juncture that, as a customer of pslzme, you have entered into a data processing agreement with us and are responsible for only using personal data for personalization via our framework that has been made freely available to you by the owners of this data in accordance with our GDPR-compliant license terms. For data security reasons, we do not offer personalization options for highly sensitive personal data such as bank details, telephone numbers, email addresses, and similar information via our pslzme framework.
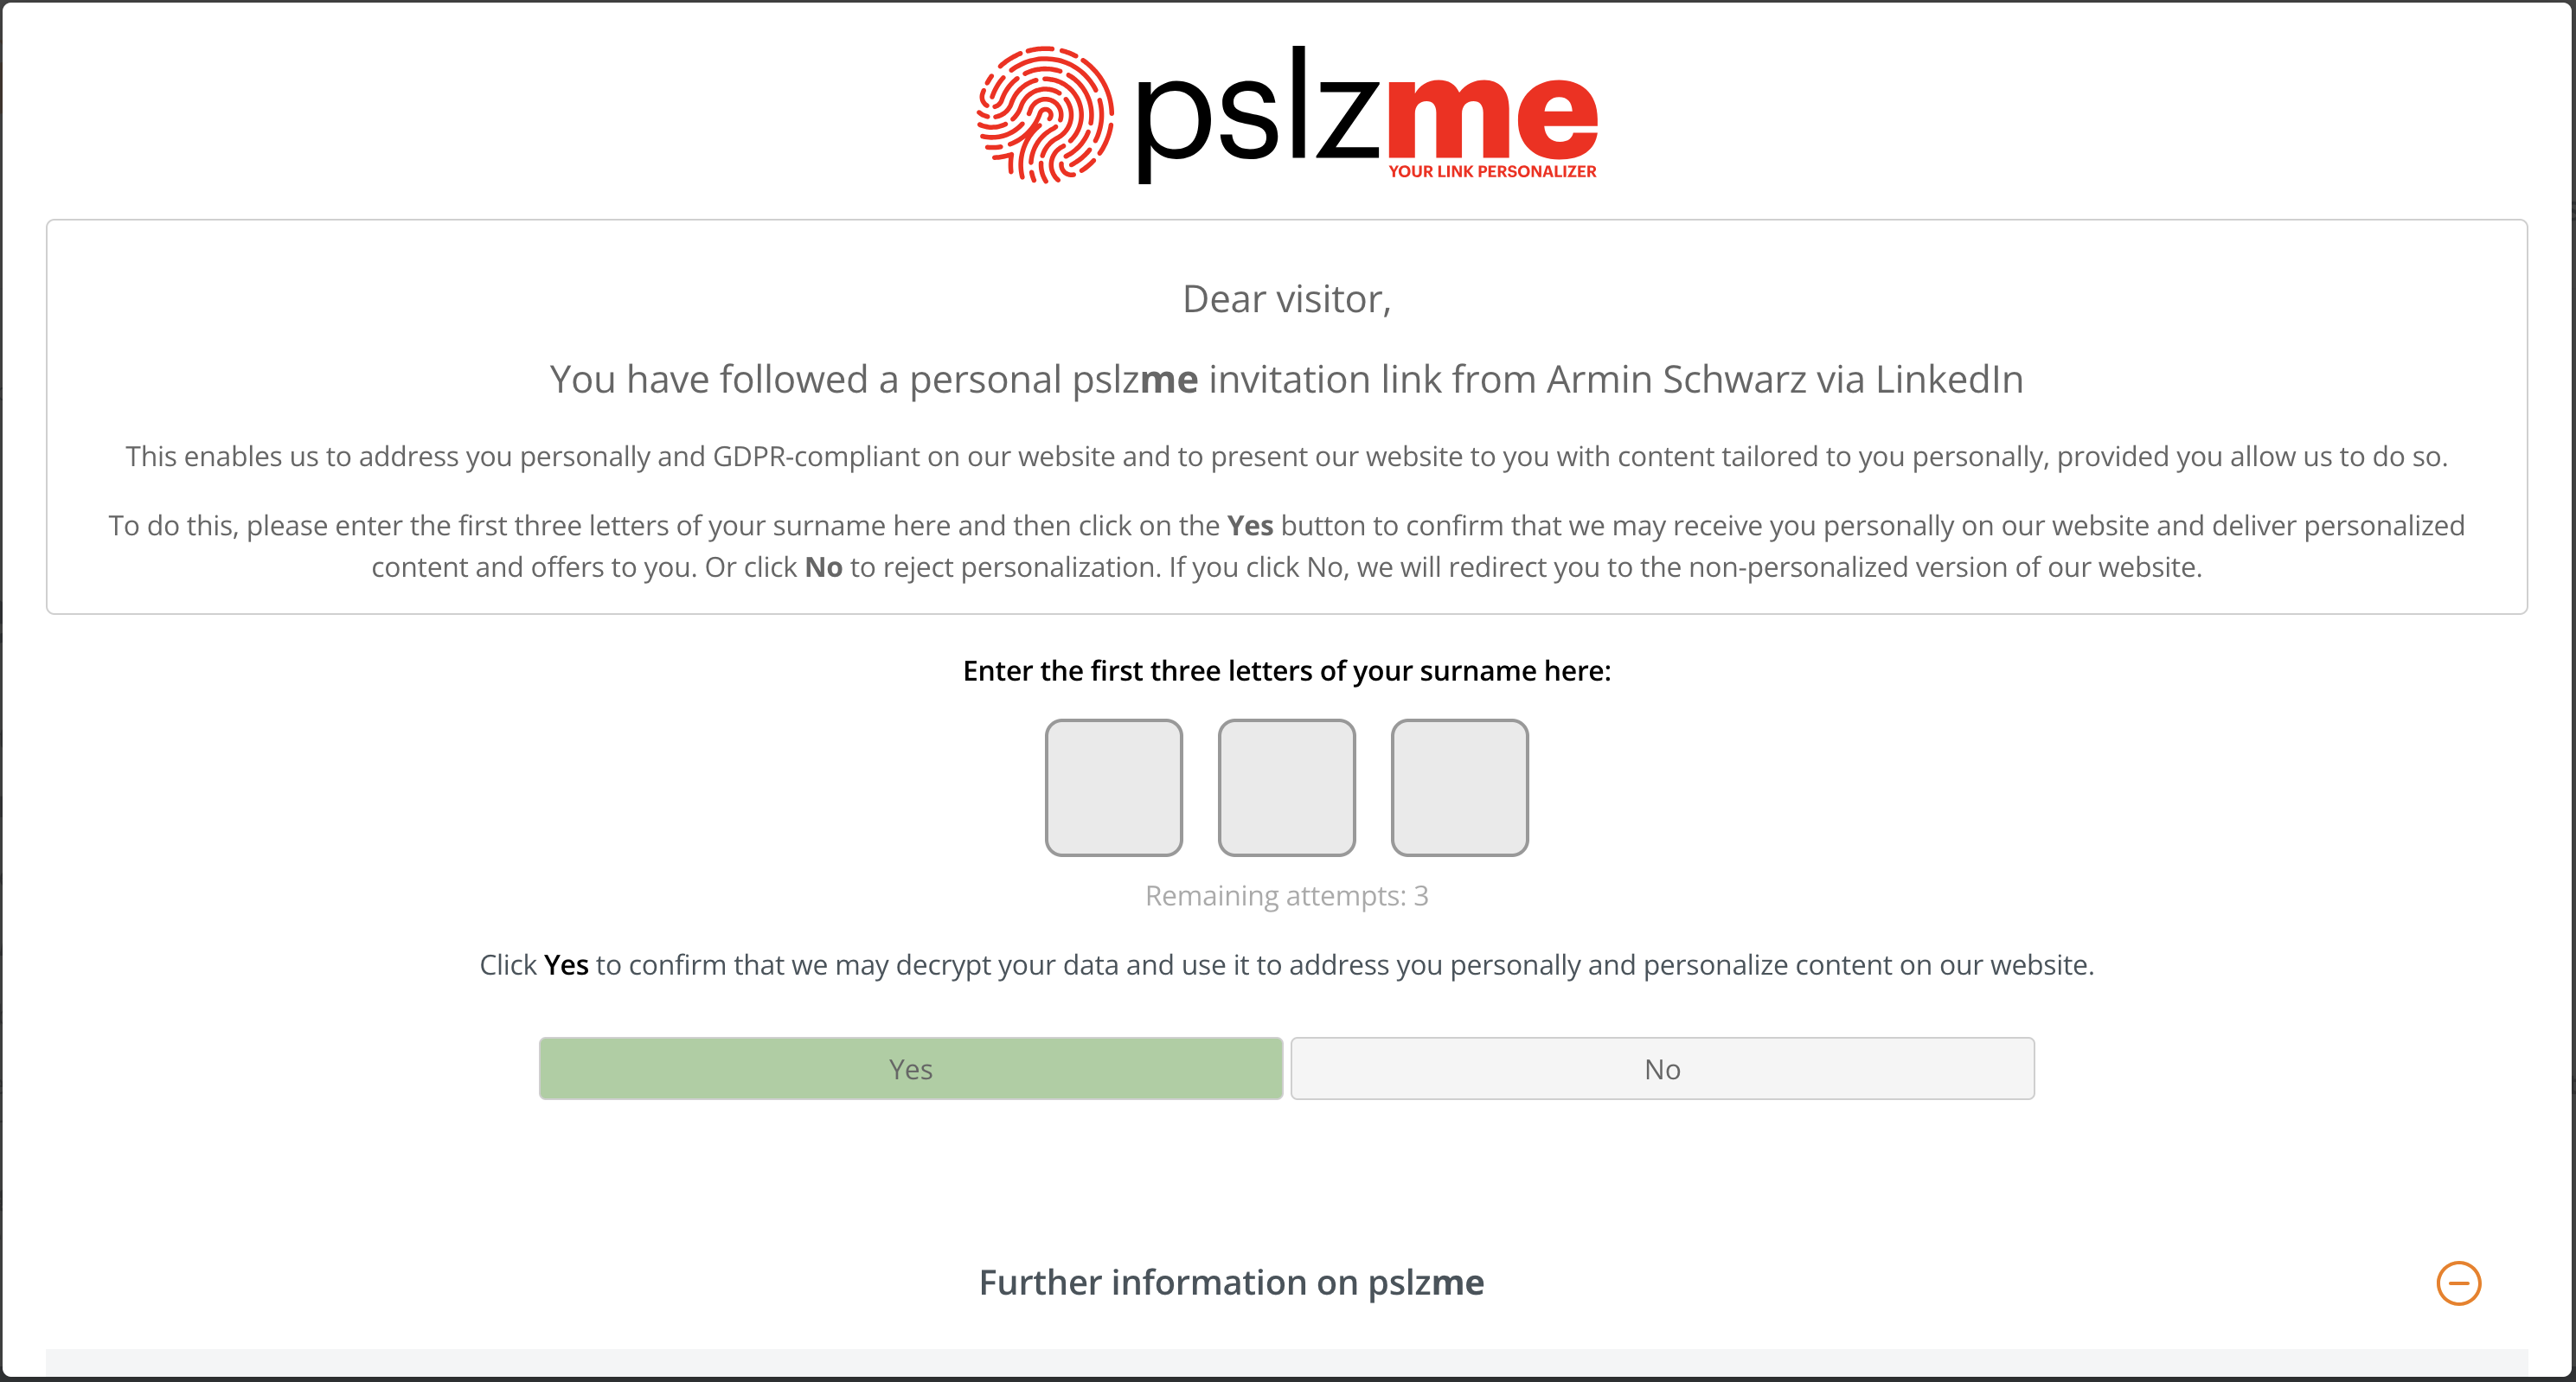
III.II Usage of the pslzme cookiebanner
When visitors follow the link, they are first redirected to the cookie banner provided. The banner itself contains some important information about pslzme and how it works. Visitors are then asked to enter the first three letters of their last name in the fields provided and to confirm the use of their personalized data by selecting "YES". The lastname is the data you previously entered in the "Lastname" field when generating the link. So if you chose the lastname "Smith", the correct combination for the user in the cookie banner would be "SMI". If the visitor decides against personalization at this point, they will be redirected to the normal version of your website and the link sent with the URL will be completely removed. If they agree, after entering their correct name, they will be redirected to the page specified in the "Target URL" field of the form. After arriving on the page, visitors have access to all the personalized elements you have prepared. The ID of your site's legal notice and privacy policy can also be found at the bottom of the cookie banner. By clicking on it, visitors are redirected to the respective page.
A specific cookie caller has also been added to your site. This is visible on all pages that use personalization. When a visitor clicks on this button, the cookie banner reopens. This gives visitors the opportunity to change their mind about personalization at a later date.
III.III Integration and use of pslzme elements
The plugin provides various types of pslzme elements that can be used depending on the application. Depending on your preference, you can use both the Elementor and Gutenberg editors to use these elements, as the plugin provides integrated solutions for both variants. Both variants and their applications are explained in more detail below.
III.III.I Integration and usage via Elementor
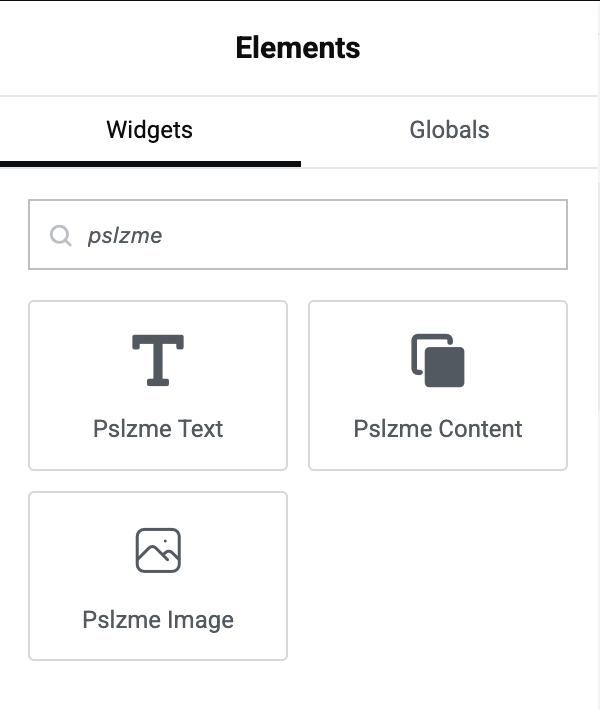
To use the pslzme Elementor widgets, please first open the page you want to edit. If you have installed the Elementor plugin—which is required to use the widgets—the Edit with Elementor option will be available at the top of the screen. The Elementor editor should then open for editing individual widgets on the page. The editor includes an option for searching for individual widgets. Enter the term pslzme there. As a result, all widgets except those provided by pslzme should be limited. The following three widgets are now available for individual customization:
III.III.I.I Output of personalized variables using the pslzme text widget
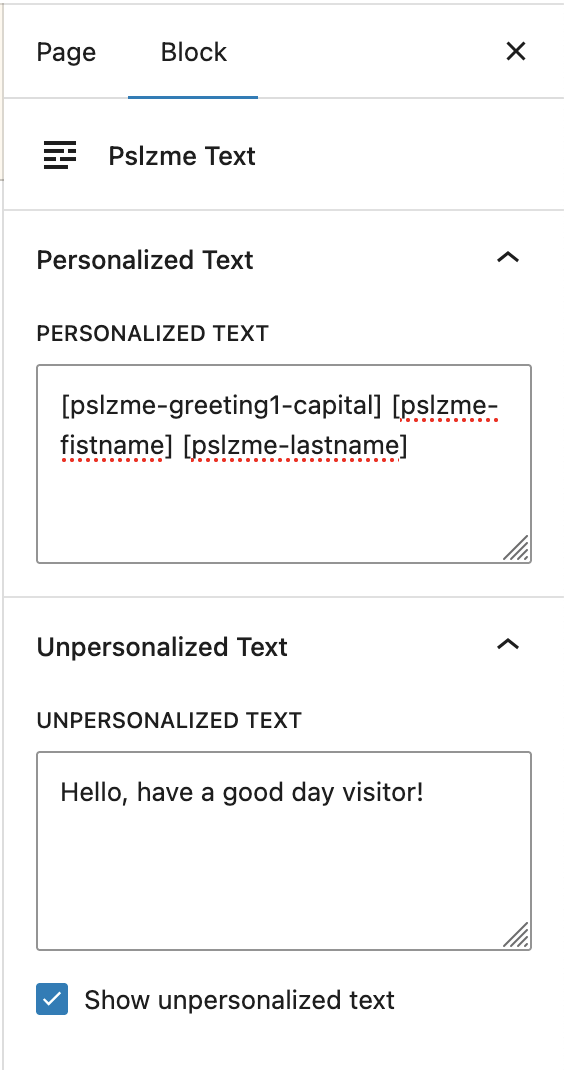
Pslzme Text:
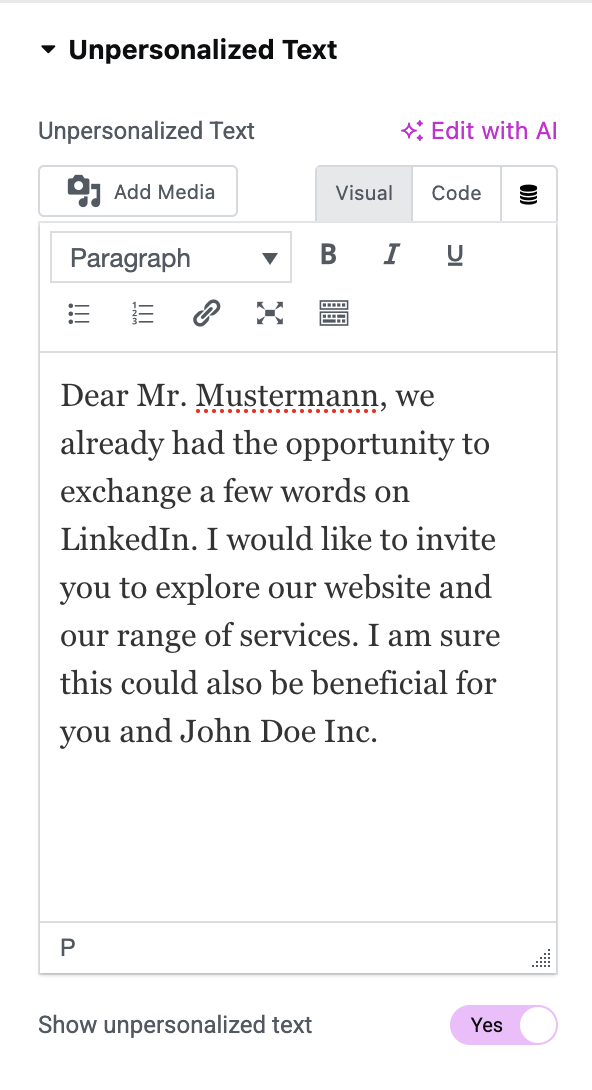
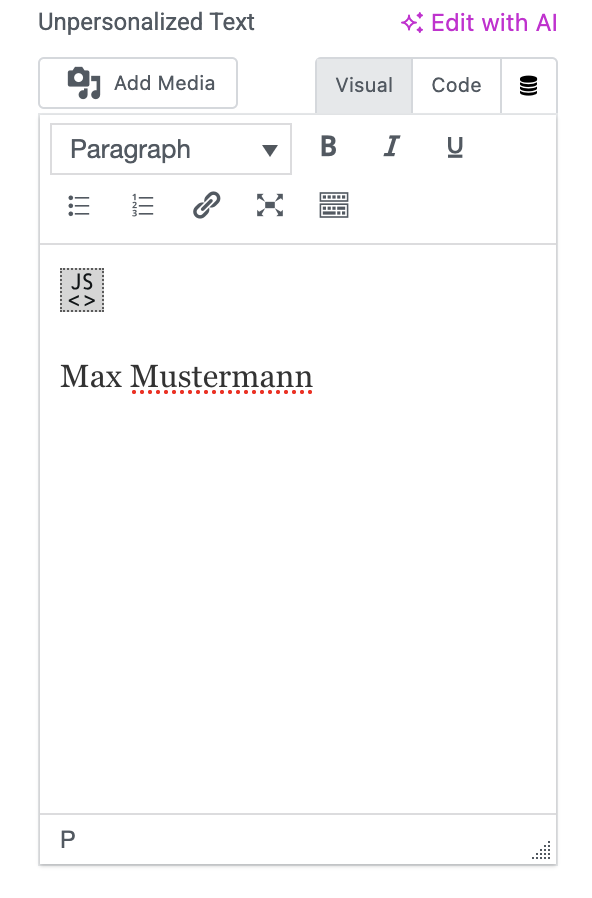
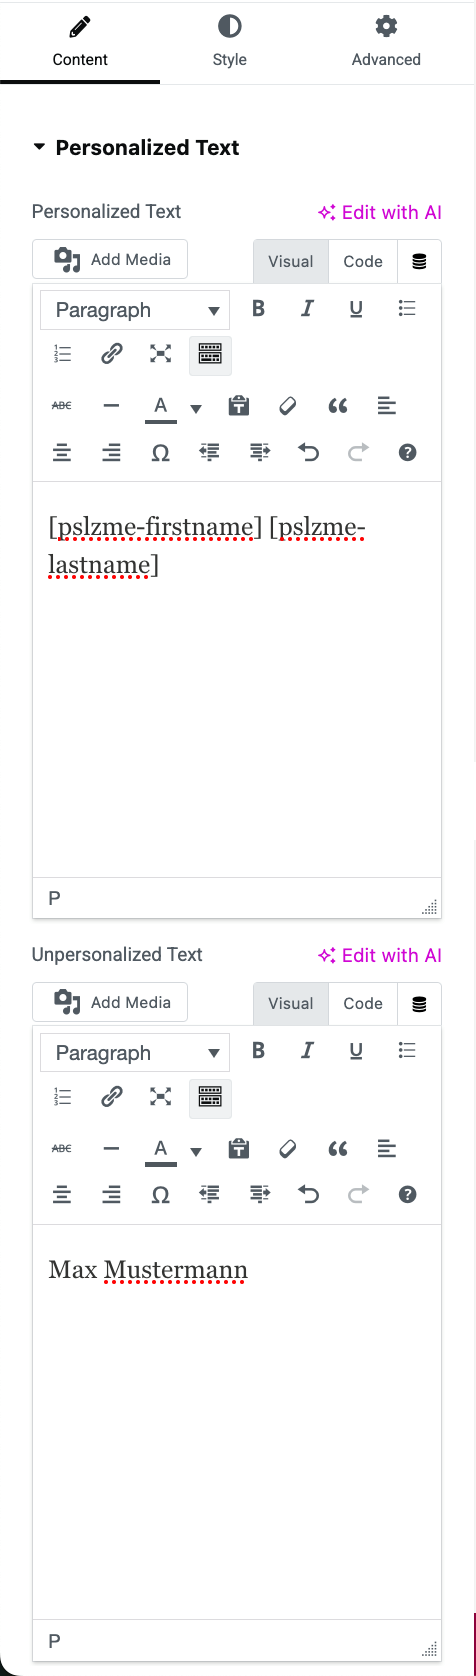
The "Pslzme Text" widget is used to display the values entered in the form on your website. To use it, drag the widget to the desired position within your page in the middle area of the editor. After that, you should see various configuration options in the left-hand section of the editor. If this is not the case, please click on the Pslzme Text Widget in the middle section again. After making your selection, you will have two configuration areas available: "Personalized text content" and "Unpersonalized text content". The widget itself can also be used without personalization and therefore without the visitor's consent. In this case, the text that you can enter in the "Unpersonalized text" text field under the "Unpersonalized text content" configuration menu will be displayed on the corresponding page. Please note that this field must always be filled in and cannot be left blank. In addition, you can decide whether or not this text should be displayed on the page. If you decide to display either personalized text or nothing at all, you can hide it by clicking on the "Show unpersonalized text" option. If a visitor has agreed to personalization, the text that you can specify in the "Personalized text" text field under the "Personalized text content" configuration menu will be displayed automatically.
WordPress includes the function of using various shortcodes. These are recognized by WordPress using a specific syntax and are translated and output accordingly. To display the specified form values, the plugin provides various shortcodes specifically for pslzme. These must be called using the following syntax:
[pslzme-identifier]
The identifier stands for the output of the corresponding form value. Below you will find a list of all available pslzme shortcodes and their meanings.
Output of the personalized link creator:
[pslzme-link-creator]
Output of the personalized title:
[pslzme-title]
Output of the personalized firstname:
[pslzme-firstname]
Output of the personalized lastname:
[pslzme-lastname]
Output of the personalized gender:
Several different shortcodes are available for displaying gender. Each of these generates a different form of address depending on gender and the currently set language preference.
[pslzme-greeting1-capital]
Output of the shortcode:
Language preference "de" and gender "male":
=> "Sehr geehrter Herr"
Language preference "de" and gender "female":
=> "Sehr geehrte Frau"
Language preference "en" and gender "male":
=> "Dear Mr."
Language preference "en" and gender "female":
=> "Dear Ms."
[pslzme-greeting1-lowercase]
Output of the shortcode:
Language preference "de" and gender "male":
=> "sehr geehrter Herr"
Language preference "de" and gender "female":
=> "sehr geehrte Frau"
Language preference "en" and gender "male":
=> "dear Mr."
Language preference "en" and gender "female":
=> "dear Ms."
[pslzme-greeting2-capital]
Output of the shortcode:
Language preference "de" and gender "male":
=> "Werter Herr"
Language preference "de" and gender "female":
=> "Werte Frau"
Language preference "en" and gender "male":
=> "Dear Mr."
Language preference "en" and gender "female":
=> "Dear Ms."
[pslzme-greeting2-lowercase]
Output of the shortcode:
Language preference "de" and gender "male":
=> "werter Herr"
Language preference "de" and gender "female":
=> "werte Frau"
Language preference "en" and gender "male":
=> "dear Mr."
Language preference "en" and gender "female":
=> "dear Ms."
[pslzme-greeting3-capital]
Output of the shortcode:
Language preference "de" and gender "male":
=> "Lieber Herr"
Language preference "de" and gender "female":
=> "Liebe Frau"
Language preference "en" and gender "male":
=> "Dearest Mr."
Language preference "en" and gender "female":
=> "Dearest Ms."
[pslzme-greeting3-lowercase]
Output of the shortcode:
Language preference "de" and gender "male":
=> "lieber Herr"
Language preference "de" and gender "female":
=> "liebe Frau"
Language preference "en" and gender "male":
=> "dearest Mr."
Language preference "en" and gender "female":
=> "dearest Ms."
[pslzme-Mr-Ms]
Output of the shortcode:
Language preference "de" and gender "male":
=> "Herr"
Language preference "de" and gender "female":
=> " Frau"
Language preference "en" and gender "male":
=> "Mr."
Language preference "en" and gender "female":
=> "Ms."
Output of the personalized company name:
[pslzme-company]
Output of the personalized company gender:
Various shortcodes are also available for displaying the company name, which can be used depending on the sentence structure and language preference. Since different cases are used in German for the dative, nominative, genitive, and accusative depending on the sentence structure, this is unfortunately unavoidable for the German language. When using the English language preference, it is not necessary to include the case, as the language modules used in the German language preference do not exist there. In this case, the output would be "The" in capital letters and "the" in lowercase letters.
[pslzme-company-gender-akk-capital]
Output of the shortcode:
Language preference "de" and company gender "m"(male):
=> "Den"
Language preference "de" and company gender "f"(female):
=> "Die"
Language preference "de" and company "d"(neuter):
=> "Das"
[pslzme-company-gender-akk-lowercase]
Output of the shortcode:
Language preference "de" and company gender "m"(male):
=> "den"
Language preference "de" and company gender "f"(female):
=> "die"
Language preference "de" and company gender "d"(neuter):
=> "das"
[pslzme-company-gender-dat-capital]
Output of the shortcode:
Language preference "de" and company gender "m"(male):
=> "Dem"
Language preference "de" and company gender "f"(female):
=> "Der"
Language preference "de" and company gender "d"(neuter):
=> "Dem"
[pslzme-company-gender-dat-lowercase]
Output of the shortcode:
Language preference "de" and company gender "m"(male):
=> "dem"
Language preference "de" and company gender "f"(female):
=> "der"
Language preference "de" and company gender "d"(neuter):
=> "dem"
[pslzme-company-gender-gen-capital]
Output of the shortcode:
Language preference "de" and company gender "m"(male):
=> "Des"
Language preference "de" and company gender "f"(female):
=> "Der"
Language preference "de" and company gender "d"(neuter):
=> "Des"
[pslzme-company-gender-gen-lowercase]
Output of the shortcode:
Language preference "de" and company gender "m"(male):
=> "des"
Language preference "de" and company gender "f"(female):
=> "der"
Language preference "de" and company gender "d"(neuter):
=> "des"
[pslzme-company-gender-nom-capital]
Output of the shortcode:
Language preference "de" and company gender "m"(male):
=> "Der"
Language preference "de" and company gender "f"(female):
=> "Die"
Language preference "de" and company gender "d"(neuter):
=> "Das"
[pslzme-company-gender-nom-lowercase]
Output of the shortcode:
Language preference "de" and company gender "m"(male):
=> "der"
Language preference "de" and company gender "f"(female):
=> "die"
Language preference "de" and company gender "d"(neuter):
=> "das"
Output of the personalized Position:
[pslzme-position]
Output of the personalized company url:
[pslzme-company-url]
Output of the personalized first contact:
[pslzme-first-contact]
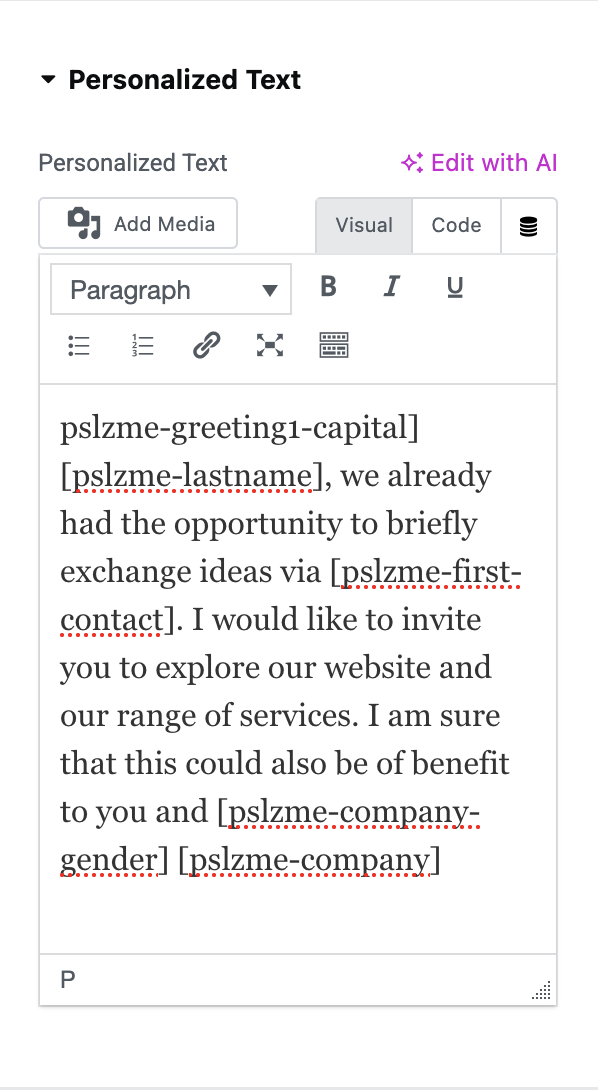
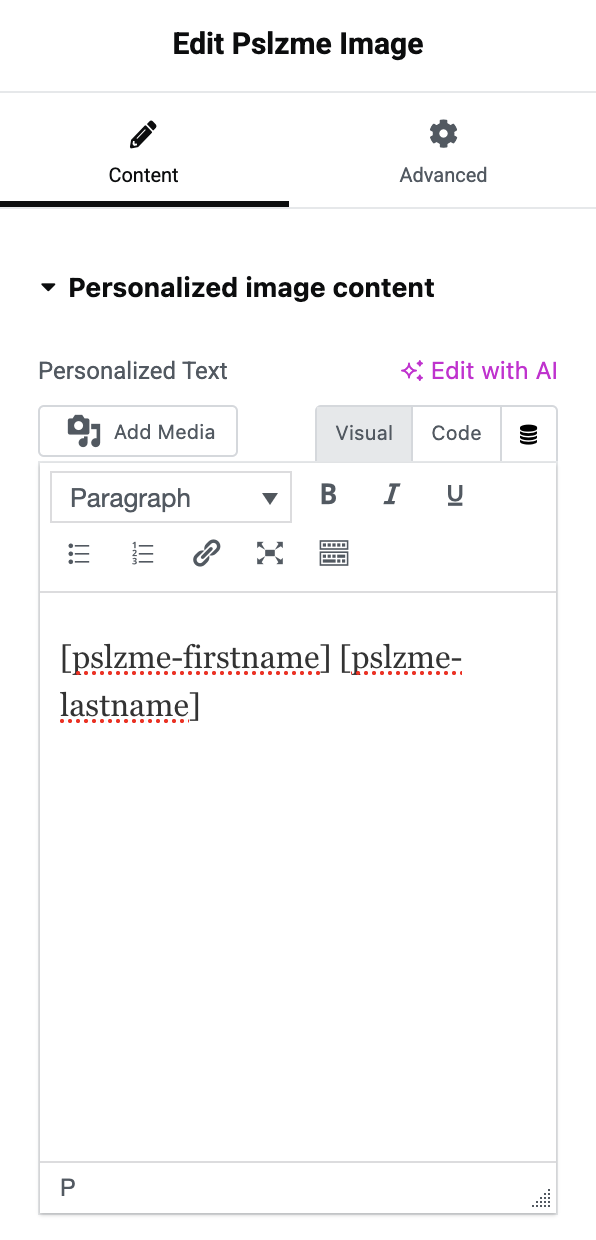
All shortcodes can be used freely in the "Personalized Text" text field to make the visitor's interaction personal and interactive. For example, if you want to display the sentences
"Dear Mr. Mustermann, we already had the opportunity to exchange a few words on LinkedIn. I would like to invite you to explore our website and our range of services. I am sure this could also be beneficial for you and John Doe Inc."
the entry in the text field will look like this:
"[pslzme-greeting1-capital] [pslzme-lastname], we already had the opportunity to briefly exchange ideas via [pslzme-first-contact]. I would like to invite you to explore our website and our range of services. I am sure that this could also be of benefit to you and [pslzme-company-gender] [pslzme-company]".
III.III.I.II Output of personalized images and videos
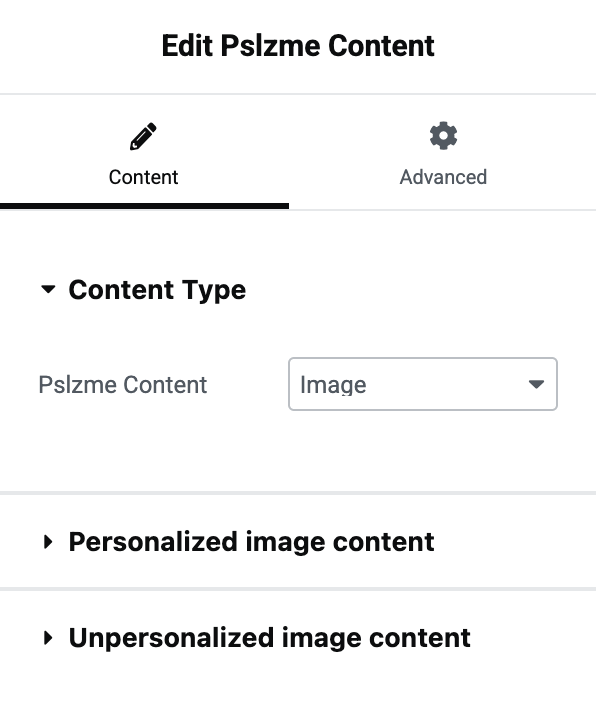
Pslzme Content:
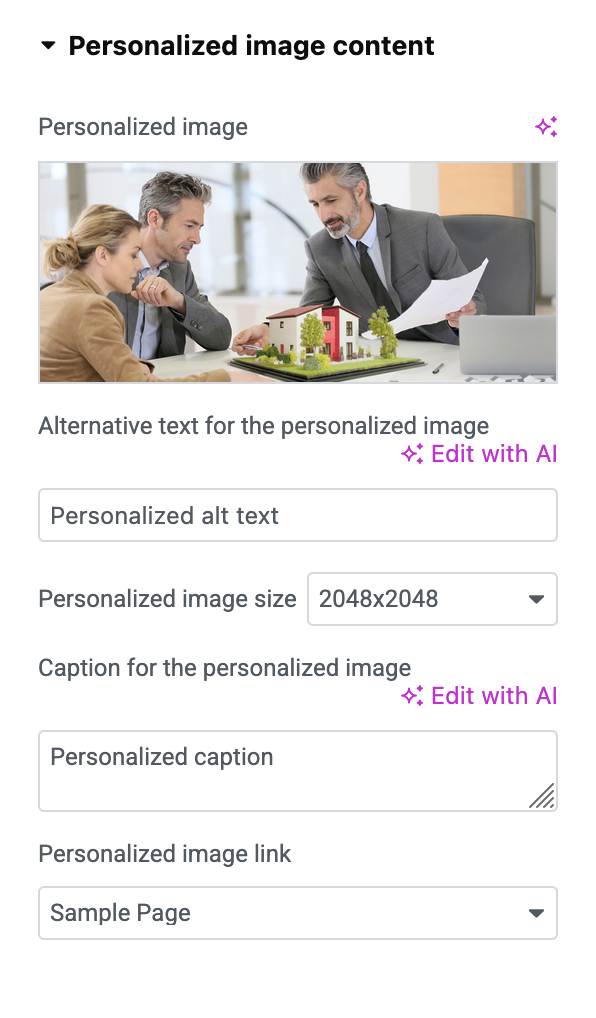
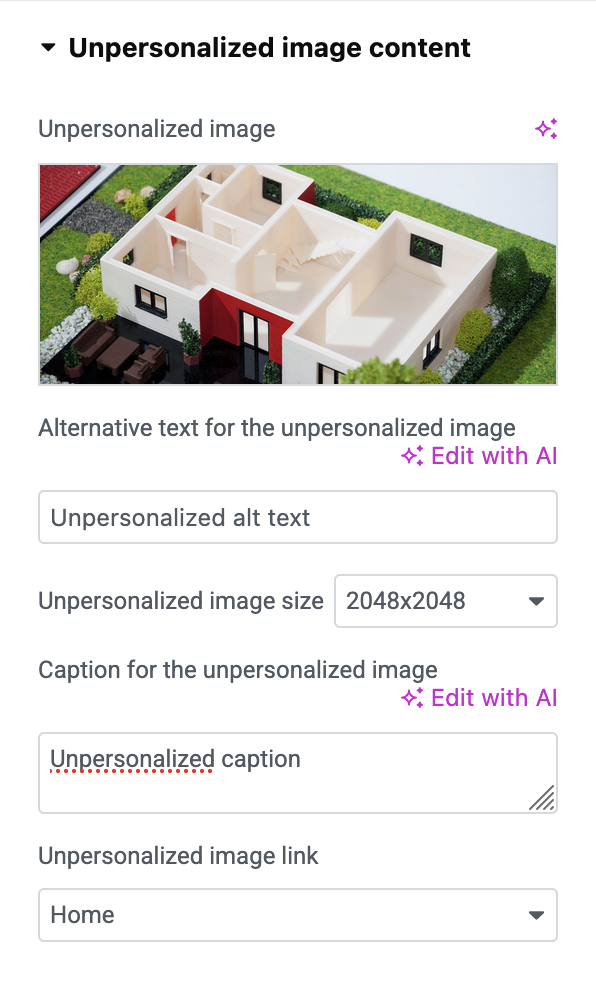
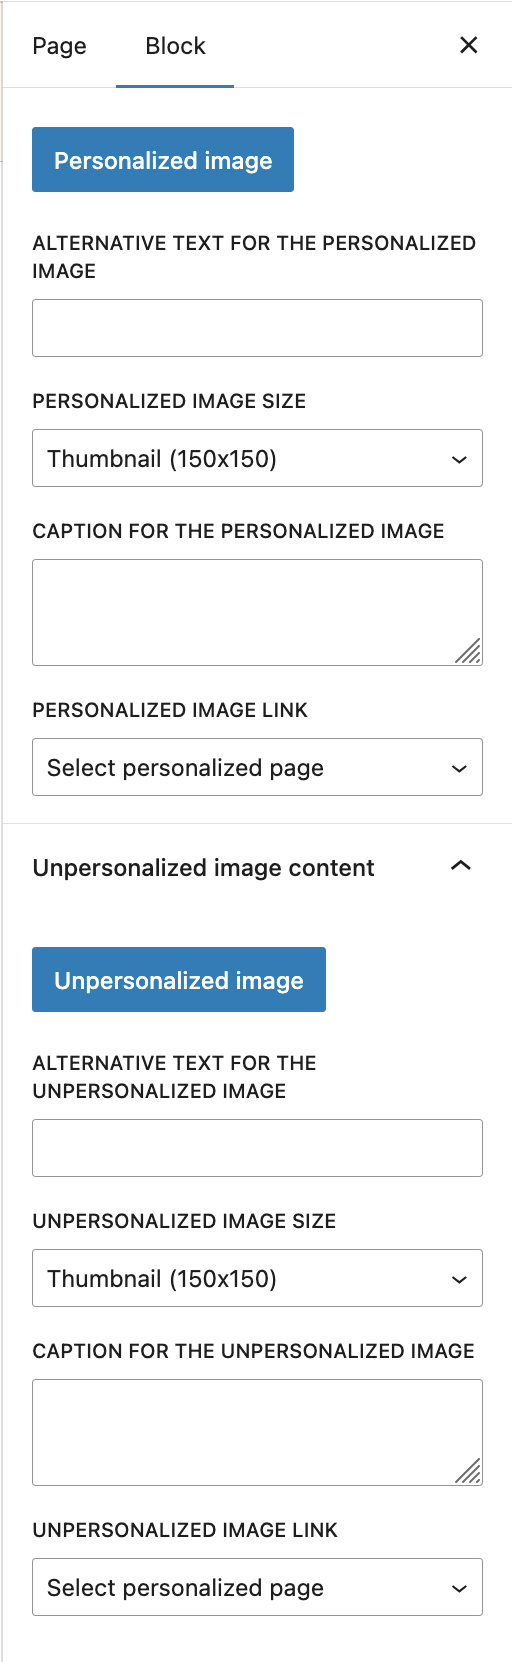
If you would rather show visitors specific images or videos that are only displayed with the consent of the personalization, you can use the "Pslzme Content" element type. In this element type, you can first choose between image and video within the content type option. Depending on your selection, different configuration options will be loaded. When you select "Images", you will see two different groupings: "Personalized Image Content" and "Unpersonalized Image Content". Here, too, the functionality is similar, which is why the image of the unpersonalized content must always be specified. By selecting the WordPress upload manager, you can choose an image and assign it a format via the image size. In addition, a caption, alternative image text, and an image link address to which the image should refer can be specified. Here too, the personalized image is automatically used in the case of personalization.
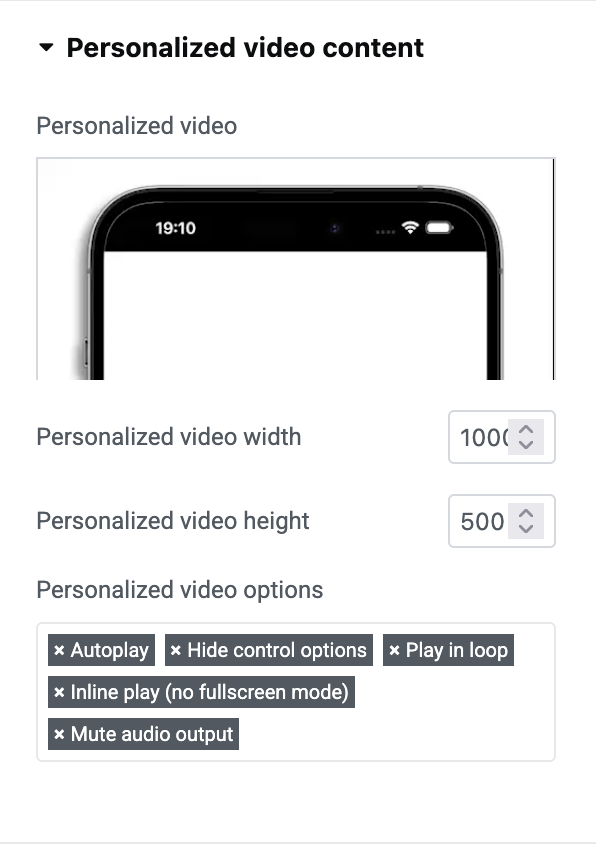
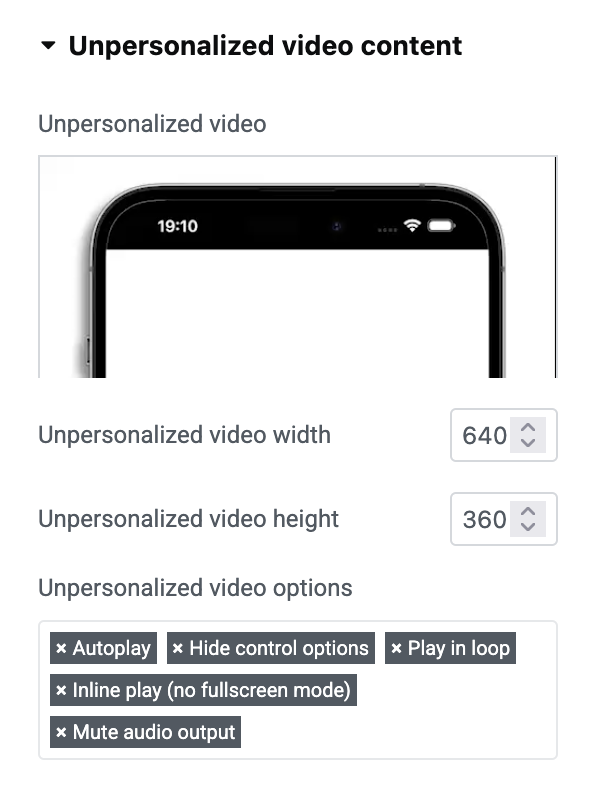
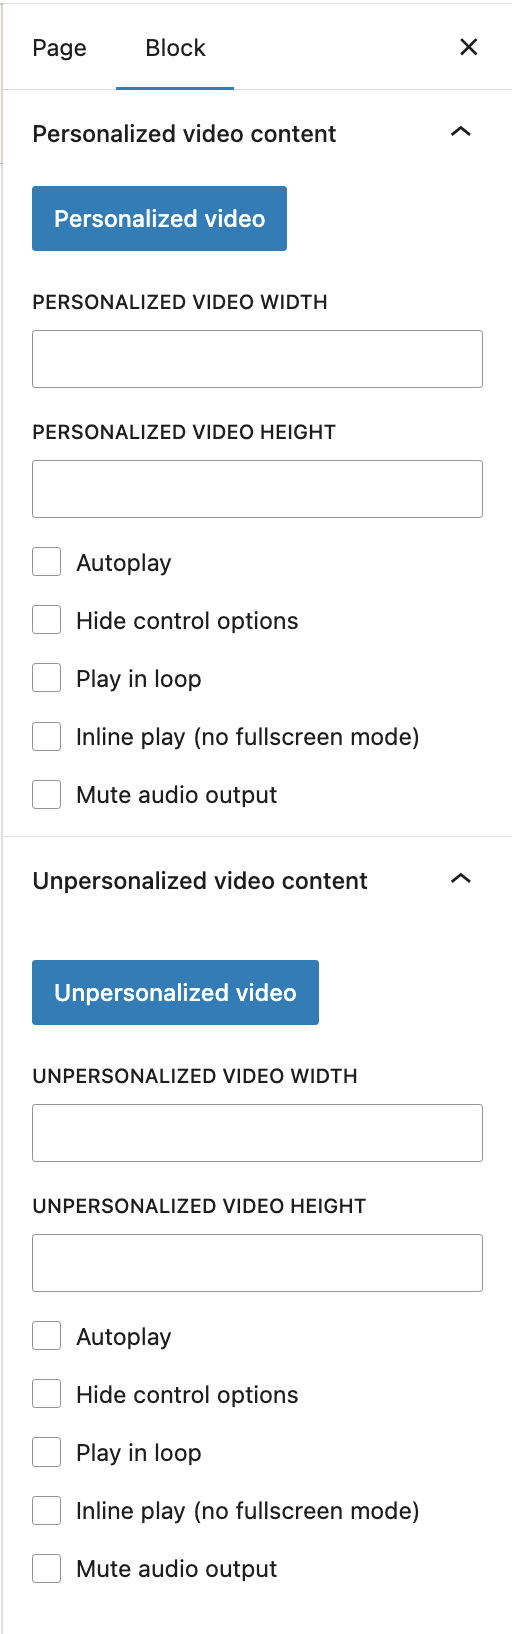
The procedure is similar when selecting the "Video" content type. Here, instead of an image, you select a video file (mp4, webm). You can then also set various options for the video player.
III.III.I.III Ouput of a personalized depth effect
Pslzme Image:
The "Pslzme Image" widget is also used to display personalized images. However, these are specially aligned and formatted images that combine to create a so-called depth effect. Here, too, you first have the option of entering personalized or unpersonalized text. Then select your desired background and foreground image. The alternative text and image title are optional. You also have the option of adding spacing to the entire image container to separate the widget from other elements on your page. The widget uses different layers of your specified values for output. The background image is on the bottom layer. This is followed by the text, which can be personalized or unpersonalized. Finally, the specified foreground image is added. The combination of these elements creates the aforementioned depth effect. Here, too, pslzme shortcodes can be used in the personalized text area. This means you can also personalize this widget specifically for certain visitors to your website. Finally, please note that both the background image and the foreground image must have the same image size so that the desired effect can be achieved flawlessly and as intended.


III.III.I.IV Output of a personalized text slider
Pslzme Marquee:
The "Pslzme Marquee" widget displays an animated slider that spans the full width of the screen and scrolls the entered personalized or unpersonalized text in a specified direction. Configuration is done as usual by using the familiar text fields for personalized and unpersonalized text. You can then specify the direction in which the animated text scrolls.

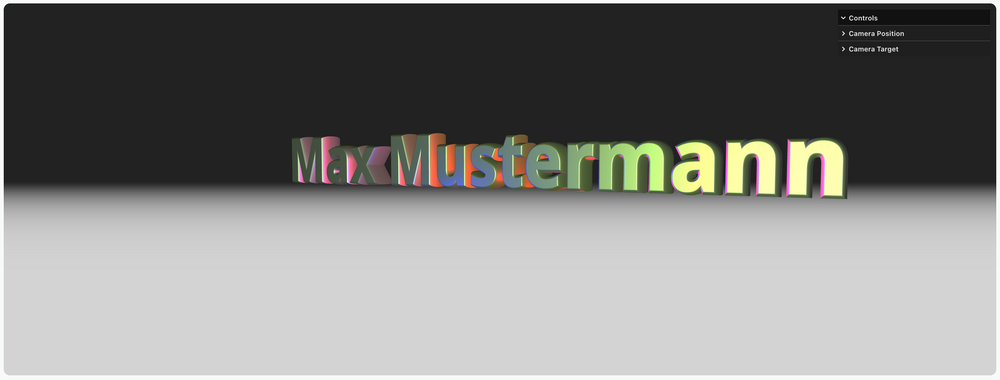
III.III.I.V Output of a personalized 3D text
Pslzme 3D Text:
The “Pslzme 3D Text” widget allows you to display personalized or unpersonalized text in a three-dimensional format. The text can be stylized—including colors, highlights, and optional animations. Configuration is done via the familiar text fields, with additional visual properties such as color, lighting accents, and camera position adjustable to optimally present the text in the frontend. This creates custom 3D lettering that captures attention and significantly enhances the visual experience of the page.
After selecting the type, the two familiar fields for entering personalized and unpersonalized text will appear, as usual. This time, the output of these fields determines whether the generated 3D text—which will ultimately be displayed on the website—contains the personalized or unpersonalized value. Below that, you’ll find three different sections for further configuring the text.
Block 1 contains various options for customizing different colors. The background color of the 3D scene determines the color of the generated canvas on which the 3D text appears. The subsequent highlight colors determine the text’s lighting. For example, if you select green as highlight color one, red as the second, and blue as the third color, the text will be highlighted with green from the front, red from the right side, and blue from the left side. This has the advantage of allowing you to decorate the text with a specific color gradient.
In Block 2, you’ll find various customization options for adjusting the camera settings. To ensure responsiveness, you can switch between different versions—Desktop, Tablet, and Mobile—and enter specific values for each. The scene’s camera will then automatically apply the corresponding settings at the appropriate scale. Camera Position X, Camera Position Y, and Camera Position Z determine the exact position of the camera in front of the 3D text. The X coordinate indicates how far to the left or right the text is located, the Y coordinate indicates how far up or down, and the Z coordinate indicates how close or how far away the camera is from the text.
The remaining input options define a specific camera target. The target specifies the direction in which the camera should face. Here, too, the three XYZ coordinates are available. This time, however, you define the camera’s rotation starting from the current position you previously specified.
In the last section, you'll find additional configuration options. Here, for example, you can choose whether the text should be surrounded by a fog effect—which can help emphasize the lighting a bit more—or whether the text should rotate continuously and automatically.

III.III.II Integration and usage via Gutenberg
As already mentioned, the plugin also supports the use of the Gutenberg block editor. Instead of widgets, individual pslzme blocks are used for editing, but they function in a similar way. To use the Gutenberg editor, please first reopen the page you want to edit. There you will find the Edit Page option at the top of the screen. This opens the corresponding Gutenberg editor. Once there, use the Block Inserter function, which allows you to insert new blocks. The option is marked with a blue plus symbol. The Block Inserter also has the option of filtering available blocks. Use the term pslzme again in the search field. All available blocks should then be filtered except for those generated by pslzme: Pslzme Text, Pslzme Content, and Pslzme Image.
III.III.II.I Output of personalized variables using the pslzme text block
Pslzme Text:
The use of the Pslzme Text Block is identical to that of the Elementor application. Only the editor area is now located on the right side of the screen instead of the left. Use the fields for personalized and unpersonalized text to output your desired content. The pslzme shortcodes can also be used in the personalized text section.
All shortcodes are composed in the same way as described in section III.III.I.I Output of personalized variables using the pslzme text widget and can also be used in the block editor in exactly the same way.
III.III.II.II Output of personalized images and videos
Pslzme Content:
The Pslzme Content Block is also available for outputting individual images and videos. Here, too, the content type is used to decide whether personalized images or videos should be used. When selecting the image option, upload your personalized and unpersonalized image via the WordPress upload manager and confirm your selection by clicking the Save button. Optionally, you can also specify alternative text, captions, and link addresses for the images here. The process is similar when selecting the video option. First, upload your desired videos for personalized and unpersonalized display and confirm your selection again by clicking the Save button. Next, select your desired player size and enter the width and height in the fields provided. Finally, you have the option of assigning various options to the player, such as muting the audio output.
III.III.II.III Ouput of a personalized depth effect
Pslzme Image:
The special "Pslzme Image" block also has the task of creating a depth effect in the Gutenberg editor by combining individual images and text. To use it, first select the block in question in the block inserter area. Unlike the other blocks and widgets, it is used slightly differently. Once the block has been registered in the middle of the editor, you will see two areas for entering personalized and unpersonalized text. Unlike the other blocks, please write your text in these predefined fields. The reason for this is that Gutenberg provides a special text block in which the specified text can be formatted as soon as it is entered. This is important in order to position and design it correctly with the desired depth effect. The text size also plays a decisive role, so that it is clear that the text is actually behind the selected foreground image.
First, use the input field for the personalized text. As always, pslzme shortcodes can and should be used in this area. Then enter the text you want to display in case of non-personalization. If you want to place the text in the center of the container you are using, select it in the desired area by clicking on it and select the Align Text option, which is located above the heading of the Pslzme Image block and is marked with a step icon. Then select the Align Text Centered option. Please note that the editor area for designing and formatting the text is only displayed once above the block heading, but both text blocks—personalized and unpersonalized—must be formatted individually. This gives you the additional option of further distinguishing between personalization and non-personalization.
The block can then be edited as usual using the options in the right-hand editor area. There you can select the desired font size and text color. The aforementioned individual customization of the texts applies to both options. Finally, upload your desired background and foreground images using the editor's upload function and confirm your selection by clicking the Save button.
III.III.II.IV Output of a personalized text slider
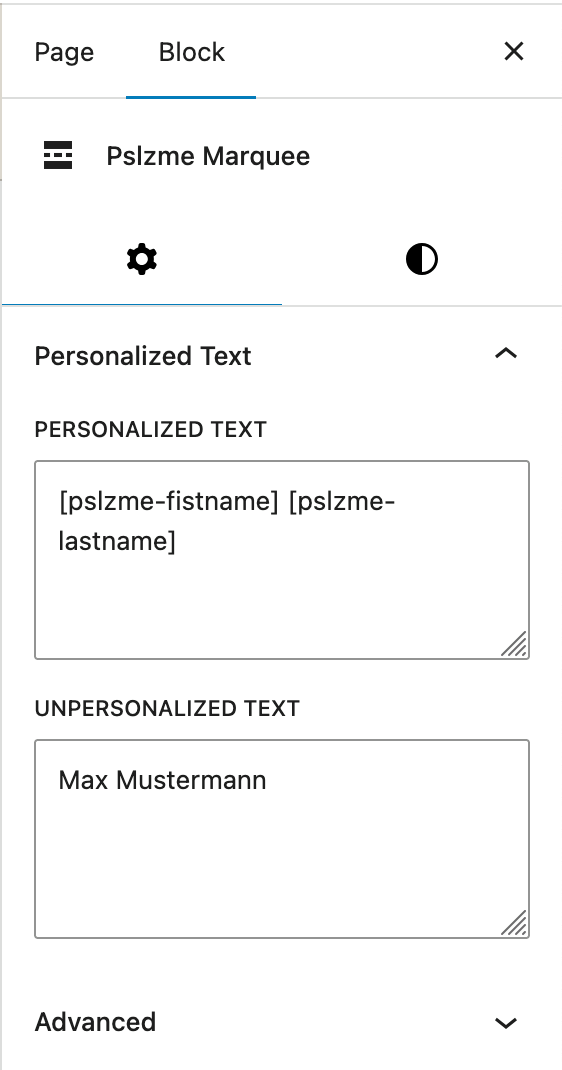
Pslzme Marquee:
The output of the animated text slider is identical to the version used in Elementor. Use the two text fields to enter the personalized and non-personalized values. You can also adjust the colors in the Style tab, located to the right of the settings.
III.III.II.V Output of a personalized 3D text
Pslzme 3D Text:
The procedure for this element type is the same as in Elementor, too. Please note that in the backend editor, the display is only symbolized by a container that contains the selected background color of the scene. This is because the 3D text is generated dynamically in the frontend using various functions and is therefore only available there with all its settings.

III.IV Usage of special pslzme pages
The plugin also involves a new special page type for WordPress. These pages should be considered as fully personalized pages that are only visible to visitors who have agreed to personalization. Otherwise, these pages will not appear in the navigation bar. This opens up the possibility of making your website a little more dynamic. This allows you to include or hide personalized pages that contain personalized 3D content or similar elements that have been developed specifically for a visitor and would not work without personalization. To use this special page type, please navigate to the WordPress admin panel menu "Pages" and select the option "Add page". Select an appropriate title for this page and confirm your selection by clicking the Save button. When you hover over the page name, you should then be able to edit this new page. Please use the "Quick edit" option here. Between customization options such as "Order" and "Title Form", you will find an editing selection for specifying the page template. Click on the corresponding button and then select the pslzme template. Finally, you need to integrate the new page into your menu. To do this, navigate to the WordPress admin area "Design > Menus". Once there, select your newly created pslzme page in the left-hand area and use the "Add to menu" button. That's all there is to it—you've now fully personalized your page. From now on, the newly created page, including all of its content, will be displayed to all visitors who agree to personalization. If they decline, the page will simply be automatically removed from the menu they are using.
